Starting quilting can feel a little overwhelming at first — especially when you walk into a fabric store or start watching quilting videos online and suddenly feel like you need everything before you can even begin.
The truth is that you do not need an entire sewing room filled with expensive supplies to start quilting.
In this beginner-friendly Christian quilting tutorial, we walk through the essential quilting tools every beginner should have, along with a few bonus tools that make quilting easier and more enjoyable as your skills grow. If you’re brand new to quilting, this guide will help you start with confidence — without overspending or feeling overwhelmed.
The Most Important Beginner Quilting Tools
When you’re first learning how to quilt, focus on tools that help you:
- cut fabric accurately
- sew safely and consistently
- press seams neatly
- reduce frustration while learning
After all, you can always add more specialized quilting supplies later! So, without further adieu, let’s dive into the top 8 tools I recommend for all beginner quilters.
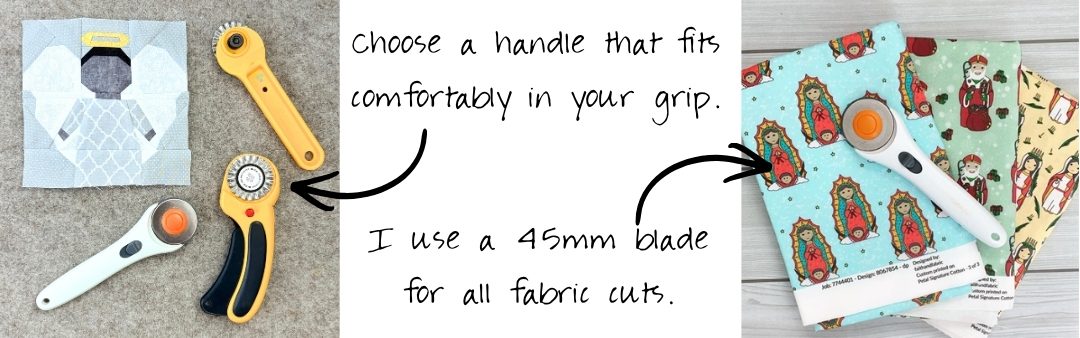
1. Rotary Cutter
A rotary cutter is one of the first tools most quilters purchase, myself included. It’s for good reason. Rotary cutters allow you to cut fabric quickly and accurately compared to traditional scissors. They work similarly to a pizza cutter and are designed specifically for quilting fabric…not pizza 🙂
For beginners, accurate cutting makes a huge difference in how well quilt blocks fit together later. Most beginners start with a quilt that is traditionally pieced (see this article for help selecting your first Christian quilt pattern), which means cutting a set number of squares or rectangles of specific dimensions. If your squares or rectangles are slightly uneven at the beginning, quilting can quickly become frustrating. A rotary cutter helps eliminate much of that problem before it starts.
I recommend selecting a rotary cutter that feels comfortable in your hand. There are multiple handle styles, as well as blade sizes, as shown below. I prefer a basic handle with a 45mm blade size. Why? Smaller blades don’t cut as smoothly for me, and most replacement blades are sold for the 45mm size. Whether trimming the angel quilt block below, or cutting through some saints yardage, the 45mm blade size worked perfectly.
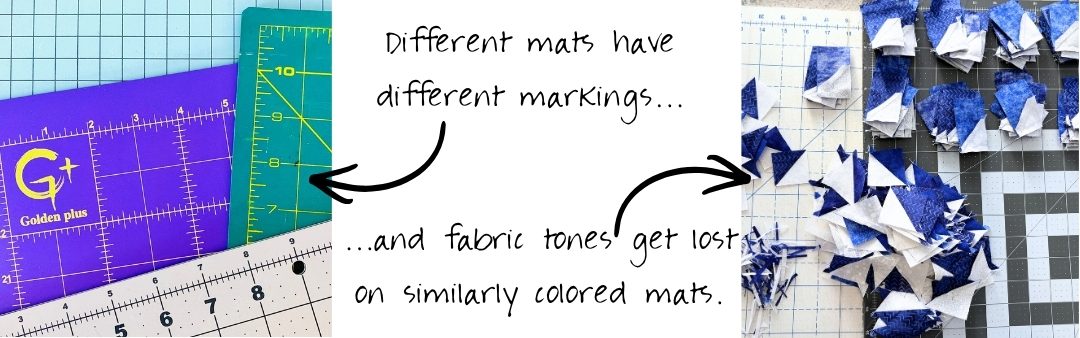
2. Self-Healing Cutting Mat
A cutting mat protects your table while also giving you measurement guides for accurate fabric cutting. While I have a full video dedicated to eight different things to look for in a cutting mat, I’ve consolidated the list down to just three things that beginners need to look for in their first cutting mat below. Here’s a link to my favorite cutting mat, too.
- SELF HEALING: A self-healing mat also lasts much longer because the surface closes back up after cutting. This means that the blade passes through the particles in the mat; the particles then close back up (aka “heal”) and you’re left with a smooth mat. It’s important to learn how to care for your self healing cutting mat, too, to extend its longevity.
- SIZE: Are you looking for a smaller cutting mat that you can travel with to quilt guild meetings at church? Or do you have a permanent space at home where you want a larger mat that better handles yardage? Determining where your cutting mat will live and whether it’s intended to travel with you will ensure you purchase the right size.
- COLOR AND GRID LINES: Most quilting cutting mats include grid lines, angle markings, and measurement guides. These markings help beginners cut straight lines and are used in conjunction with your quilt rulers. Another good tip is to find a mat that is double sided where one side is darker and the reverse lighter. As shown below, it’s easier to cut white and light fabrics on a dark mat, whereas darker fabrics are easier to see against a light background. You can see how the blue and white half square triangles (from the Faith and Freedom quilt) blend into each respective mat; the white becomes almost impossible to see against the white cutting mat and the darker blue blends into the background of the gray mat.
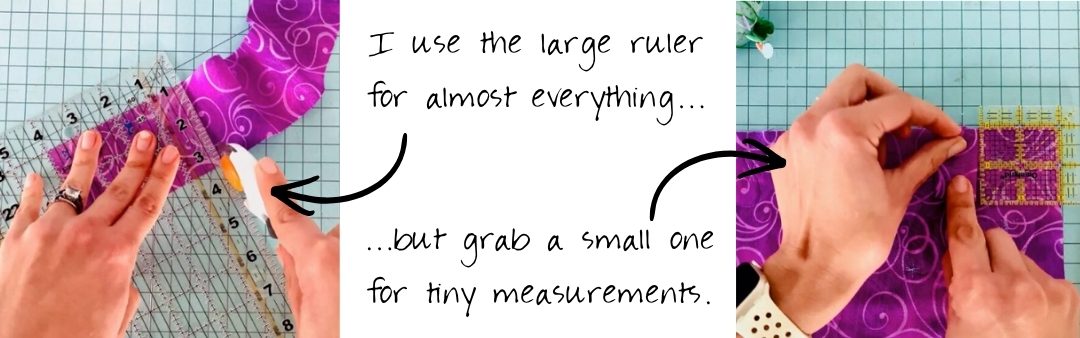
3. Quilting Rulers
Quilting rulers work together with rotary cutters and cutting mats to create precise fabric cuts. They help you to cut straight edges, square up fabric, trim quilt blocks accurately, and measure seam allowances when foundation paper piecing.
Even though rulers may not feel exciting, they are one of the biggest keys to reducing quilting frustration. They’re also, in my opinion, one of the most overwhelming tools; there seem to be hundreds on the wall in quilt shops! For beginners, a long rectangular quilting ruler (measuring 6″x24″) is often the most versatile place to start…and, if you’re like me, it may be one of the only rulers you ever need. I use my larger ruler for 99% of my projects, only relying on the smaller ruler for tiny measurements like in the Good Friday wall hanging.
4. Steam Iron
Pressing is one of the most underrated parts of quilting. A good steam iron helps your quilt blocks lie flat, improves accuracy, and gives your finished quilt a cleaner, more polished look.
Many beginner quilters are surprised by how much ironing happens during quilting, but pressing seams properly truly makes a difference (when quilting, we want to press – not iron our fabric!). I’ve been using a steam iron by Sunbeam for years, and I regularly maintain it to keep it clean and well functioning.
The first thing to look for when purchasing an iron is to find one that has a steam feature. A steam setting works great on the yardage when you bring it home from the quilt store to remove those stubborn creases. Once you start piecing, though, turn the steam feature off. Damp cotton stretches and distorts easily, which can lead to misaligned points and inaccurate block sizes.
A retractable cord is my second must-have on an iron. Retractable cords not only make for neater and tidier quilting spaces, but the virtually eliminate the tripping hazard when not in use.
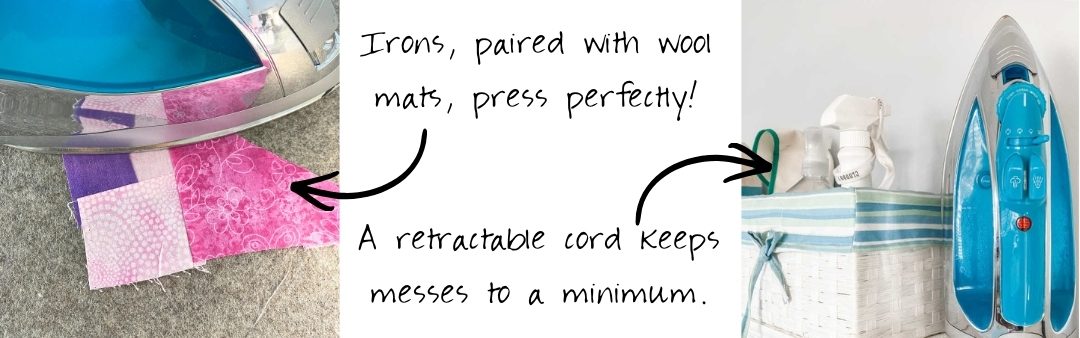
5. Wool Pressing Mat
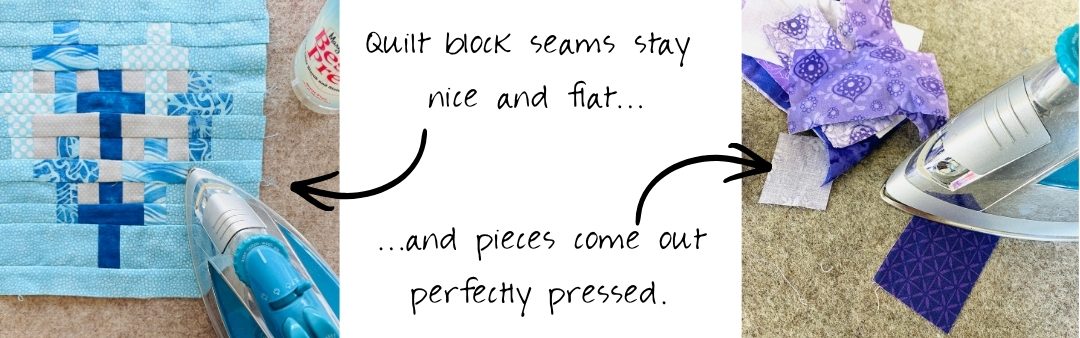
A wool pressing mat is technically optional for beginners, but many quilters absolutely love them once they try one. I used a standard ironing board for years, but found the wool mat to be a game changer for me. Why? Wool mats help retain heat underneath the fabric, which can make pressing more effective and efficient. My seams became crisper and fabrics more stiff with Best Press (more on that in a moment), both of which made my final quilts more beautiful.
Wool pressing mats are especially helpful for not just crisp seams, but for final pressing of blocks when you have thicker seam connection points that need to be as flat as possible, keeping beside your sewing machine when foundation paper piecing as the mats are smaller and can be used anywhere, and for taking to guild meeting at church since they’re so transportable. They come in many sizes, too, so you can pick one that fits the size and needs of your quilting space. I love how perfectly pressed the Love One Another block turned out with my “pressing trifecta” of a quality iron, wool mat, and Best Press!
6. Best Press
Best Press is a fabric pressing spray designed to help remove wrinkles and improve crispness while ironing. While it’s not absolutely necessary, I always use it because it helps fabric behave more predictably during cutting and sewing.
Best Press is similar, but not the same as, starch. Best Press is sizing alternative that relaxes wrinkles and stiffens fabric without leaving behind flaking, white residue, or clogging your iron. Traditional starch is a heavier spray that stiffens fabric significantly, but can sometimes flake and build up on your ironing board or wool mat. Nobody wants that.
You’ll see above, in both the iron and wool mat images, some Best Press. You guys, this is the perfect pressing pairing! 🙂
7. Quilting Pins
Pins help hold fabric pieces together before sewing. As a beginner, pins can help improve accuracy and keep seams aligned properly while you learn – though you’ll never stop using pins.
There are a few things to look for in pins, including:
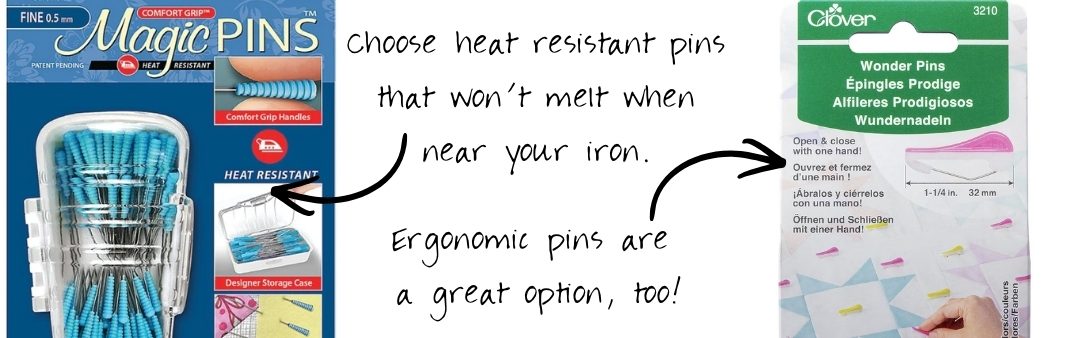
- PIN HEAD: look for a pin that has a glass ball or metal head, as plastic pins will melt if too close to your iron. I’m super excited about these Magic Pins, which have a comfortable grip *and* are heat resistant. Double win! The most unique pin head is the Clover Wonder Pin, designed for ease in grip.
- PIN MATERIAL: purchase pins that are nickel or stainless steel coated. Over time and with use, pins can rust – and that rust on the shaft of the pin will ruin your fabric when the two come into contact.
- PIN LENGTH: sewing pins, usually 1″ in length, are smaller than quilting pins which are 1.5″ in length. Choose a longer quilting pin as you’ll be piercing through multiple layers of fabric as you make your quilts.
8. Seam Rippers (Yes, Really)
Every quilter needs a seam ripper, especially yours truly. It’s not because we’re failing or because we’re bad at quilting, but because mistakes are simply part of the quilting process. In many ways, quilting mirrors faith. We learn, make mistakes, begin again, and keep moving forward one step at a time…kind of like receiving the Sacrament of Reconciliation, a seam ripper makes things anew! There’s actually something deeply humbling — and even grace-filled — about carefully undoing stitches and trying again.
When it comes to purchasing a seam ripper, look for:
- ERGONOMIC HANDLE: Choose a thick, rubberized, or molded grip over thin plastic handles to prevent hand cramps during long projects
- PROTECTIVE “SAFETY BALL”: Ensure the blunted prong features a smooth safety ball to prevent puncturing or tearing your fabric.
- REPLACEABLE OR HIGH-QUALITY BLADES: Choose a model with surgical-grade steel or replaceable heads, as dull blades will snag and ruin delicate fabric.
Bonus Beginner Quilting Tools
Once you feel more comfortable quilting, these additional tools can also be helpful (especially as you start making more Christian quilts!).
Fabric Sheers
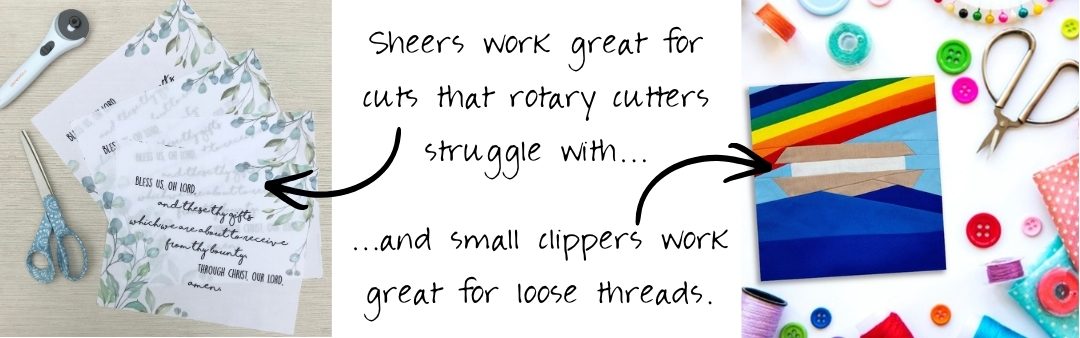
Good fabric scissors (aka sheers) are helpful for trimming threads, cutting smaller pieces, and protecting your rotary cutter blade from unnecessary wear. When making the Grace Before Meals placemats, shown below, I rotated between using the rotary cutter to cut the fabrics and the sheers to trim edges and cut smaller strip pieces. Be sure to label your shears “fabric only” so they don’t get used on paper, food packaging, or other materials that would ruin them! Over time, you’ll also want to get a small pair of thread sheers or clippers, like those shown below with the Noah’s Ark quilt block. They work great for loose threads and tiny seam trimmings.
Chalk Pencils
Chalk pencils allow you to temporarily mark fabric for sewing lines, quilting guides, or placement marks. For years I’ve used this Sewline 3-in-1 pencil until it finally broke; I loved that it had a darker pencil and white chalk, making it functional no matter the type of fabric I was using.
Binding Clips
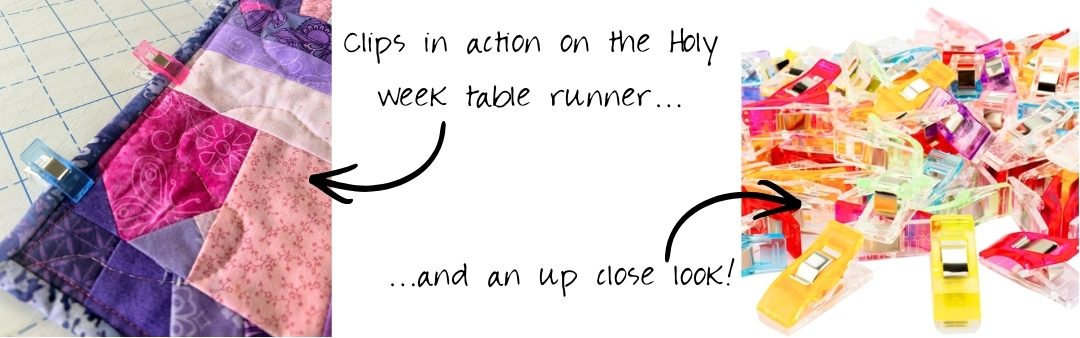
Binding clips help hold quilt binding in place without needing pins. Many quilters find them especially useful when finishing quilts, but I honestly use mine often in place of pins…especially when working on foundation paper pieced blocks like those in the Women of the Bible quilt. They hold the paper pieces together so well! Shown below are the clips in action on the Holy Week table runner; I stitched the binding down (so much faster than hand sewing) and the clips kept the binding held perfectly in place while I stitched!
You Don’t Need Everything All At Once
One of the biggest misconceptions beginners have is thinking they need a fully stocked sewing room before starting. Honestly, though, you don’t.
Start with the basics, learn one skill at a time, and build your quilting supplies gradually. It’s like our faith journey; we start off learning the basics of Christianity until we grow and make it our own. Thank you for sewing your faith with me!
Christian Quilting for Beginners: The Series
This post is part of an entire series dedicated to beginner Christian Quilters! Together we explore not just pattern selection but quilting tool selection, ways to add scripture to your quilt, and even create your first beginner Christian quilt. Check out the full Christian Quilting for Beginner series here!
Leave a Reply