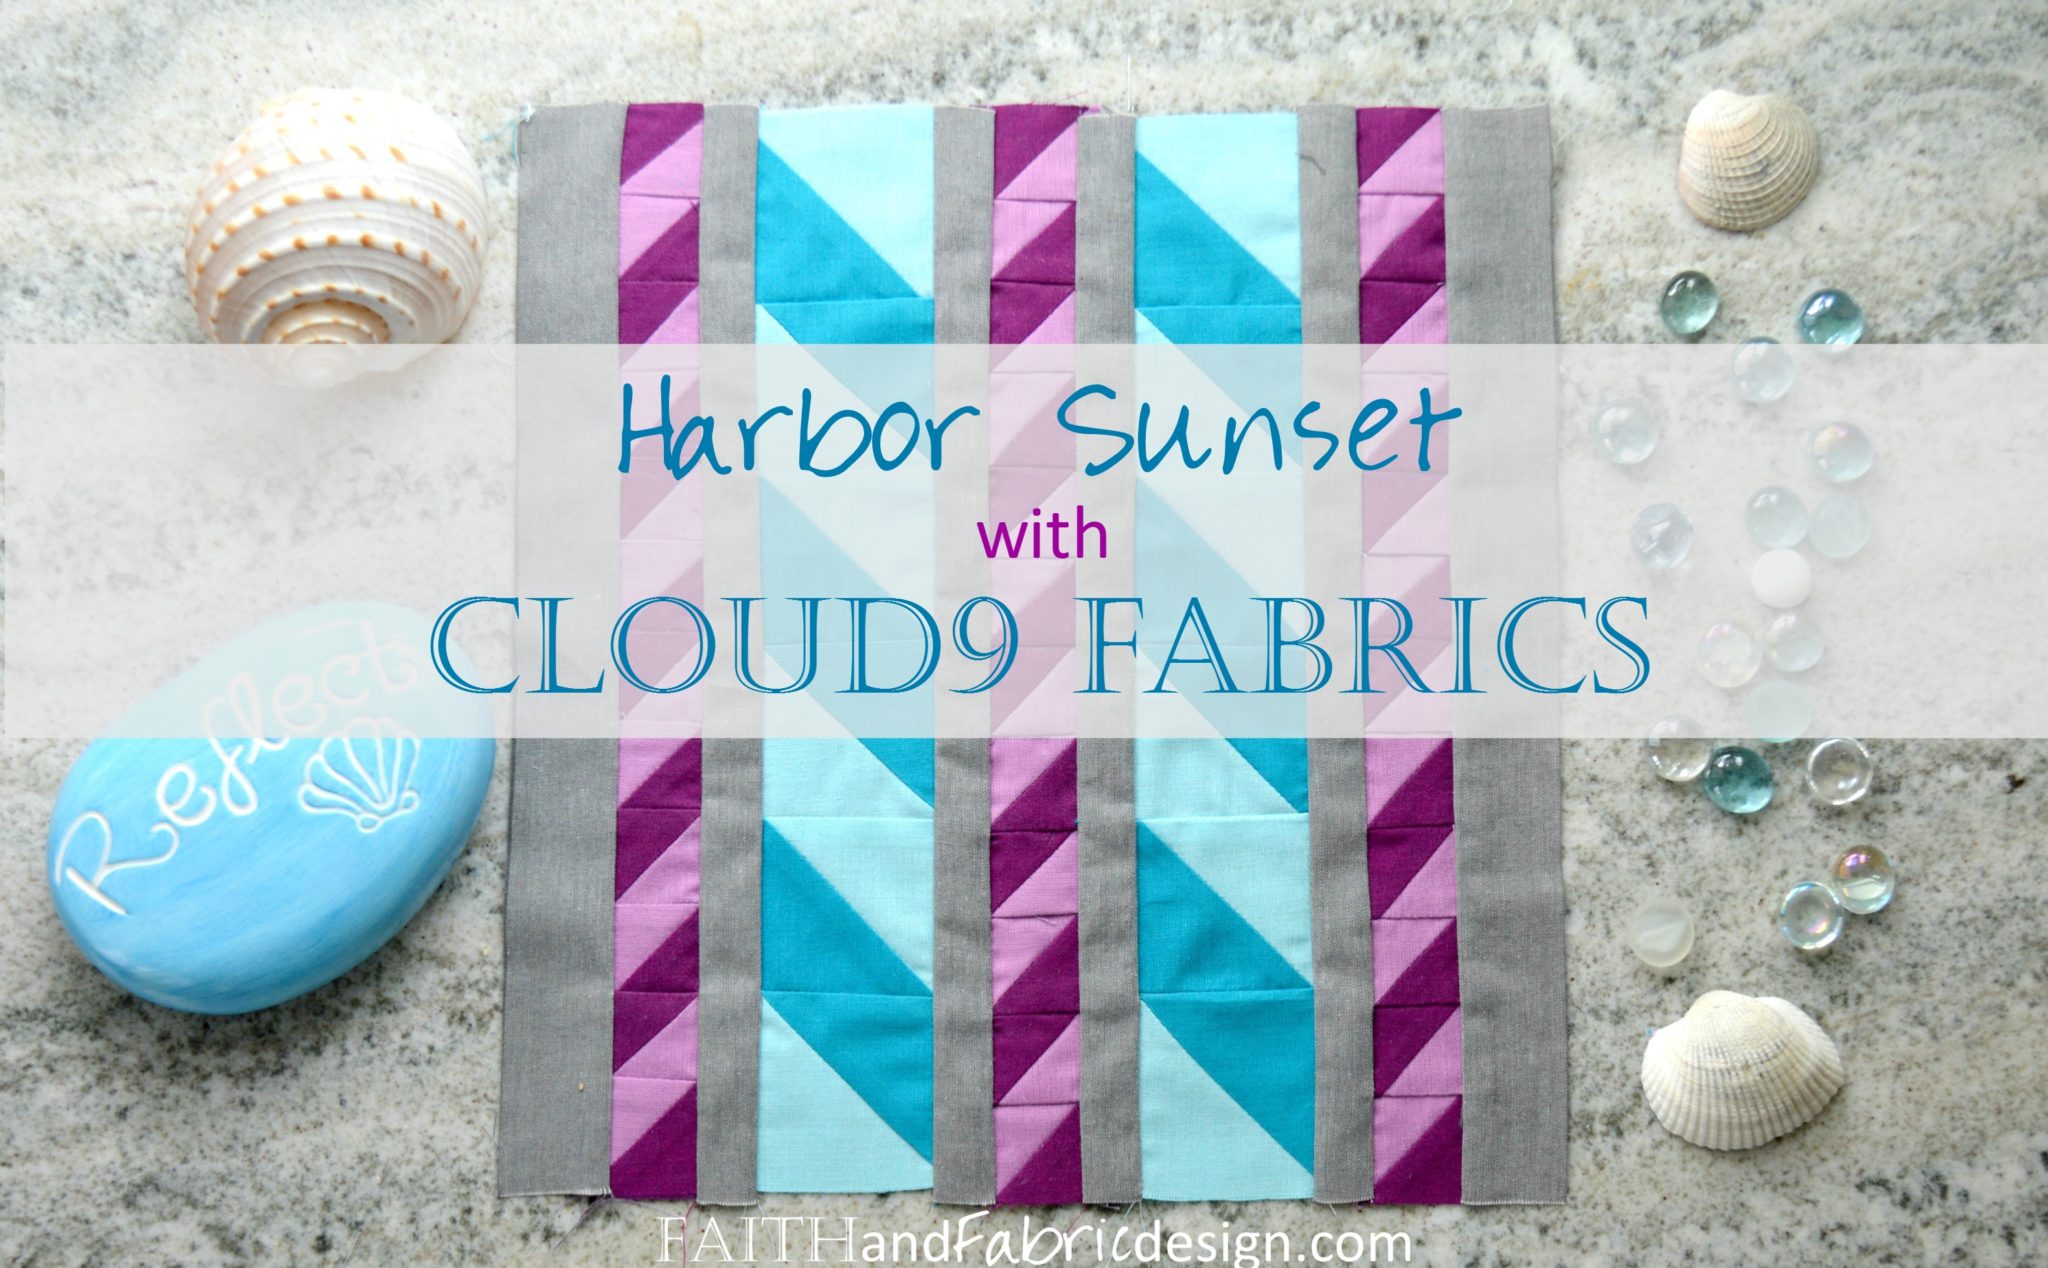
I’m always up for a good challenge, which is why it was genuinely so enjoyable to participate in the 2016 Cloud9 Blog Hop. The challenge? Create a free quilt block pattern using these five fabrics, generously provided by Cloud9.
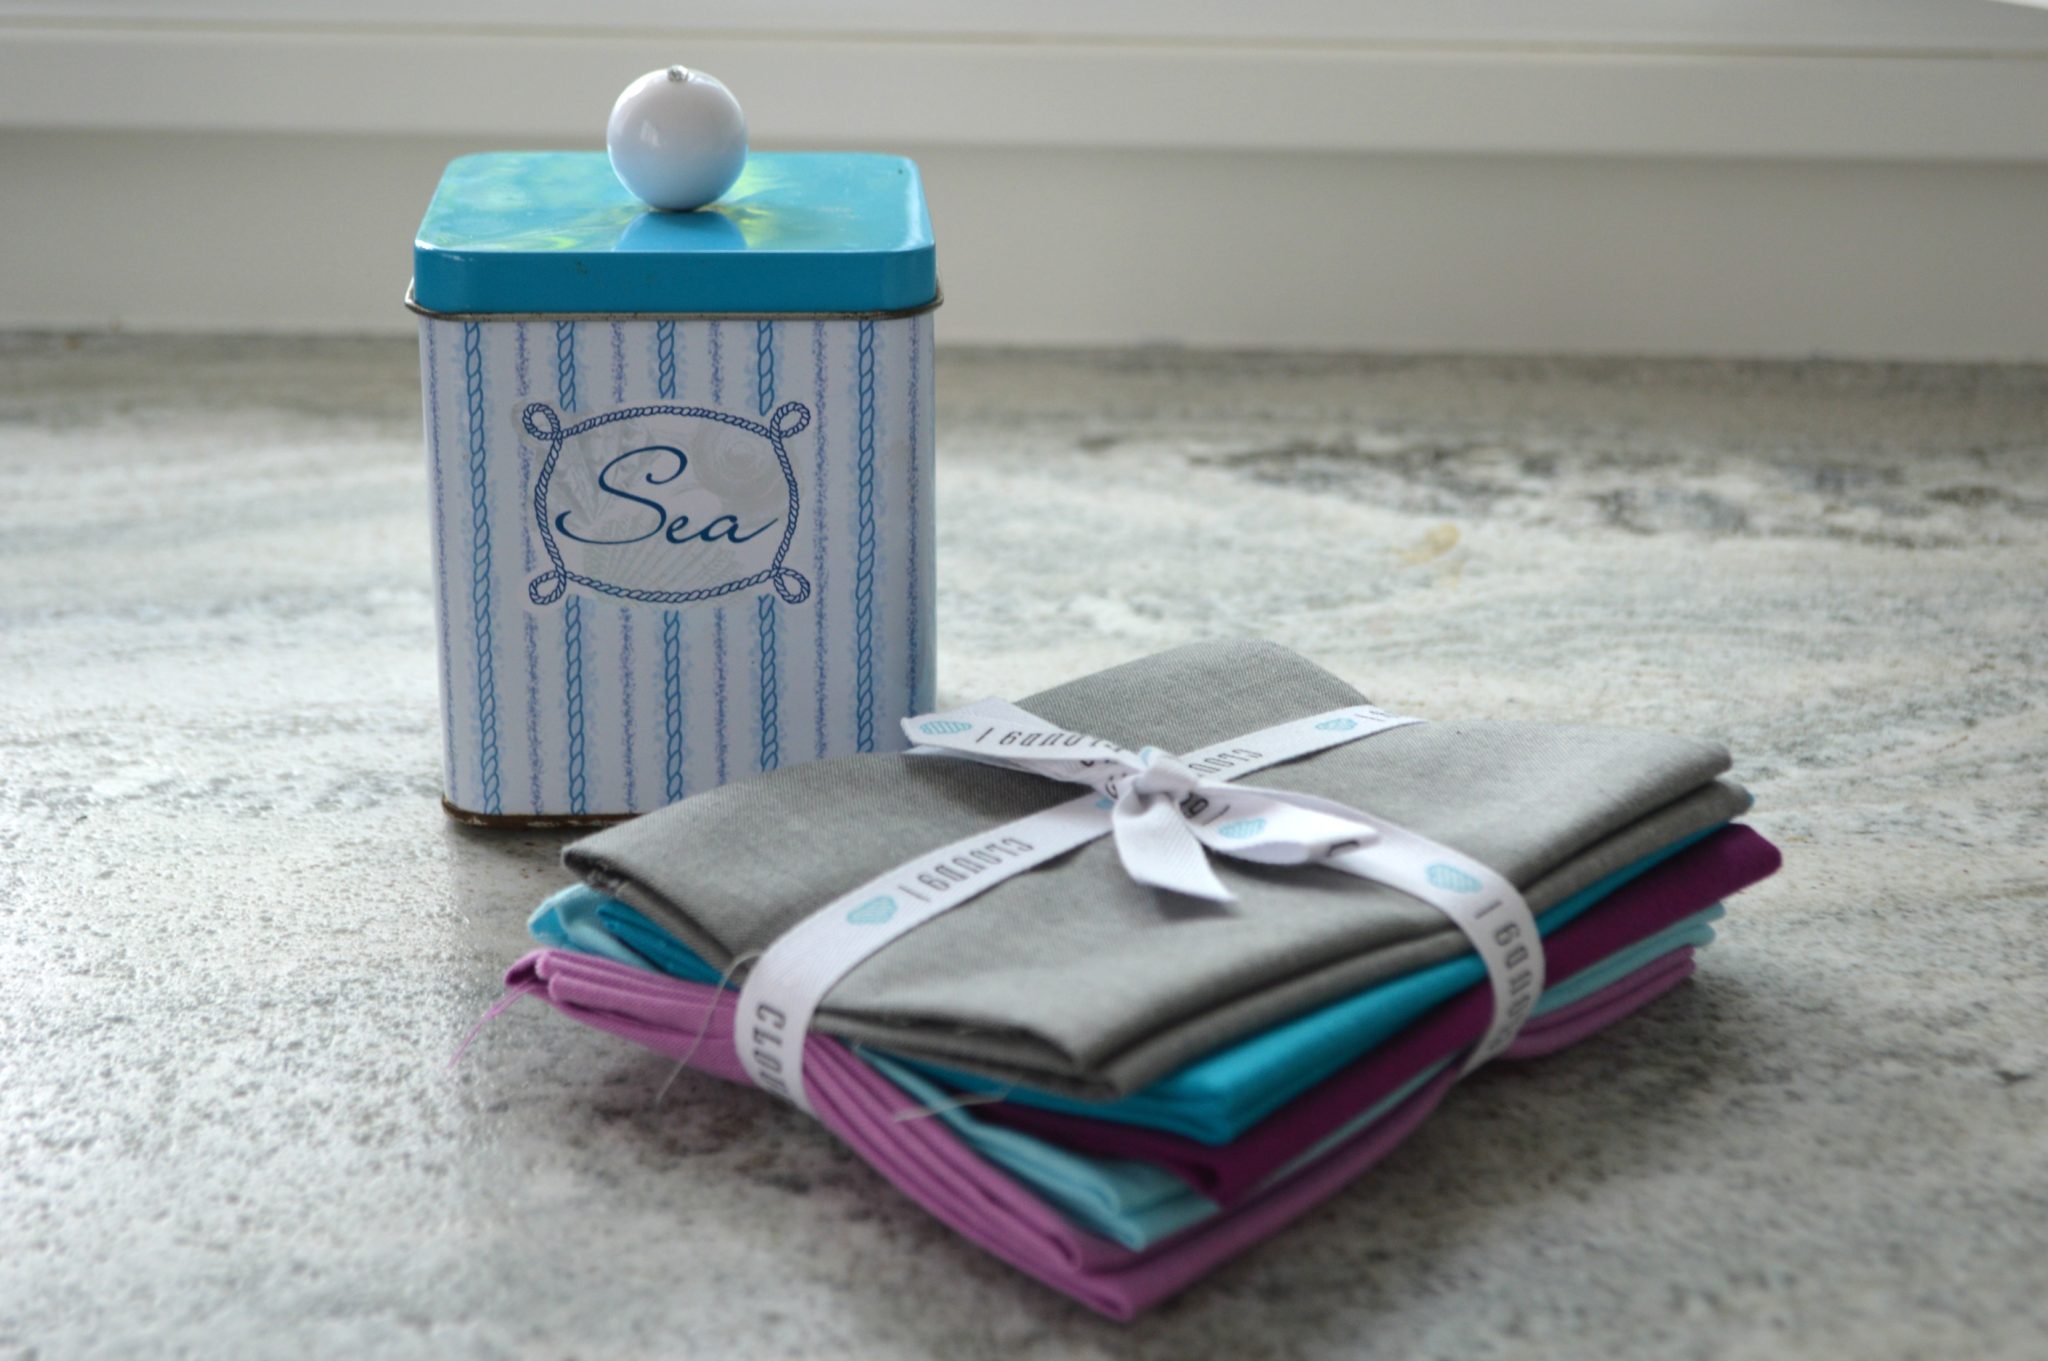
First, let’s talk about Cloud9. Cound9 Fabrics stand out as they produce 100% certified organic cotton fabric. The lovely fabrics shown below are from their solids collection, but they have a wide range of prints (as well as laminated fabrics, which I can *not* wait to try out for the upcoming rainy season!).
As to this specific fabric…the colors are lovely. They’re warm, soft, and can’t help but remind me of the twill slacks my father wore to work (they gray, not the pink!). The threads in these particular solids are a looser weave than I’ve worked with before, which was a good lesson in different fabric types. Let’s talk about lessons learned on this project:
- If you haven’t worked with a looser-woven fabric, I would recommend using this fabric for a larger pieced block as the looser weave can stretch. This was one of my first times working with a looser weave, and you’ll see that my small-pieced block isn’t as crisp as it could have been had I selected a pattern that was comprised of larger piecing. Another tip when working with a looser weave is to use a starch; if your store-bought starch leaves a residue or stain, try a 50/50 mix of water and Vodka.
- One other lesson learned? *ALWAYS* check the 1/4″ line on your foot. I switched from using the universal foot on my Brother to a universal foot on my White (the back-up machine I used while my Brother was getting a much-needed tune-up and clean at the shop), and it made a *major* difference…not in a good way. If you look closely at the block below, you’ll notice that the lines don’t line up across the block. I realized this a tad too late – the center of the 1/4″ on one of my machines measures just above 1/4″, and the center of the 1/4″ on the other machine measures just under. When you’re working with many small pieces that are all combined into one, that ultra small difference adds up – all in all, the pink ropes (sewn on the machine that measured just above 1/4″) ended up almost a full 1/4″ larger than the blue ropes, which were sewn on the machine that measured just below 1/4″.
…but back to the block! When it came time to create the block, I sat down with my sketchbook. I’ve recently finished making a nativity quilt, “Silent Night”, and really didn’t want to create a block that was a repeating pattern around a central point after just creating nine of them for this quilt. A few doodles later, and I found myself looking out the window at the *gorgeous* sunset…in almost the same colors we were given. We live near the beach, and the sunsets have been created from above this summer; the pinks, roses, and blues that appear on an almost nightly basis take your breath away.
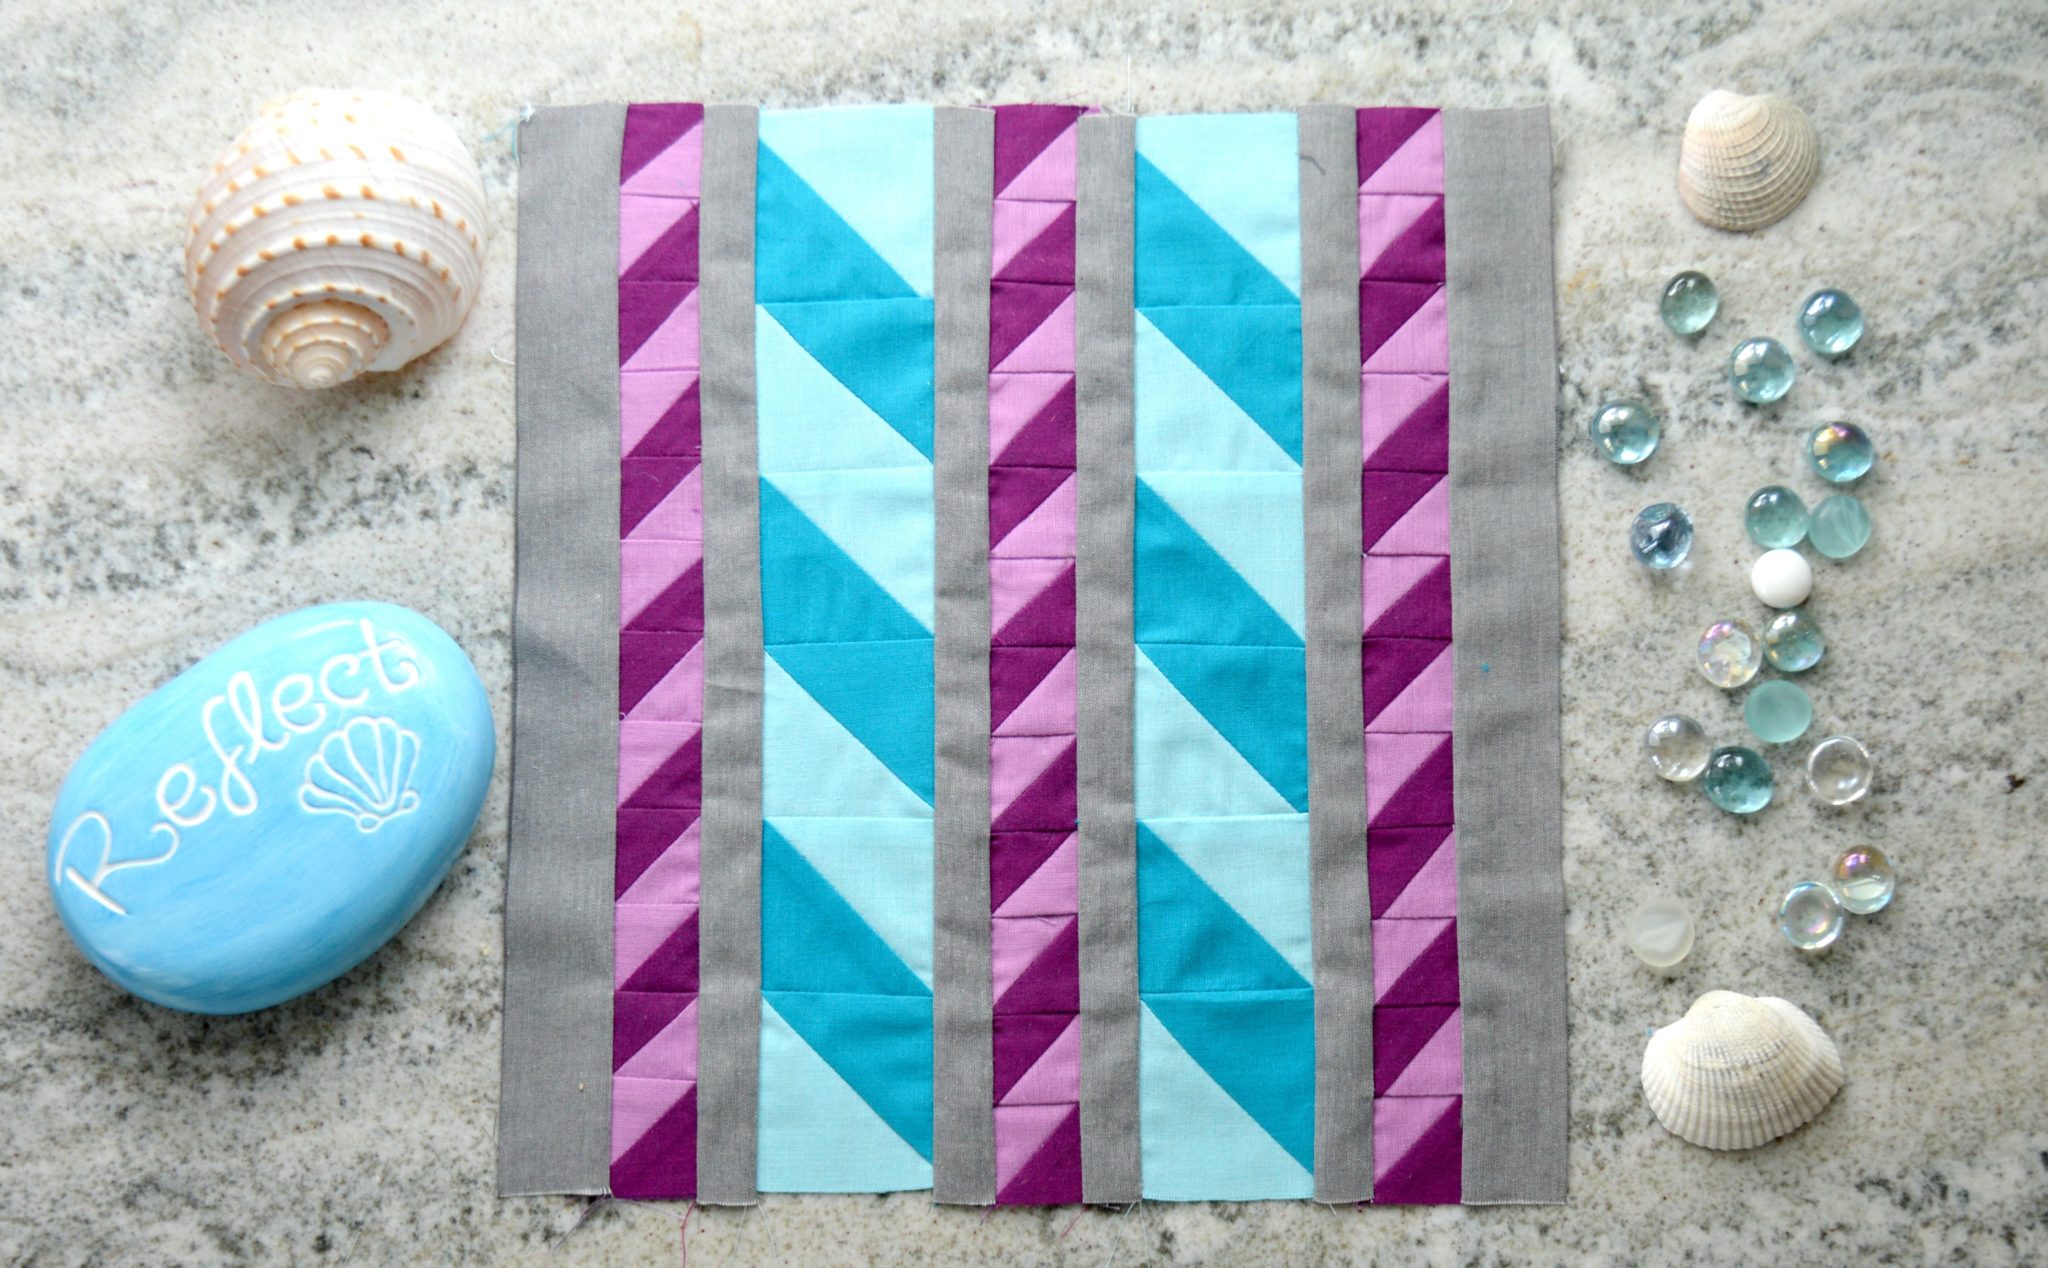
I noticed this small metal tin beside my quilting notepad as I tried to refocus, and inspiration came! I loved the look of the ropes in the tin – they reminded me of the ropes we always see tying the boats to the docks down by the harbor. Using the sunset colors, I created a block made of both thick and thin ropes; the strands in the ropes are created by the alternate color pattern in the block, and the gray as the background in this “Harbor Sunset” block! That said, I can’t wait to try this out with Christmas colors…this would look adorable as red and white candy cane stripes!
This block comes together rather quickly, and is a great opportunity to practice half square triangles (HST). We’ll be making them using the traditional method.
MATERIALS AND CUTS:
- Pull fabrics (less than a quarter yard of each color) in the following colors: light blue, medium blue, light rose, medium rose, and gray
- From the rose fabrics, cut:
- 18 squares measuring 1-7/8″ x 1-7/8″ from the light rose fabric
- 18 squares measuring 1-7/8″ x 1-7/8″ from the medium rose fabric
- From blue fabrics, cut:
- 6 squares measuring 2-7/8″ x 2-7/8″ from the light blue fabric
- 6 squares measuring 2-7/8″ x 2-7/8″ from the medium blue fabric
- From the gray fabric, cut:
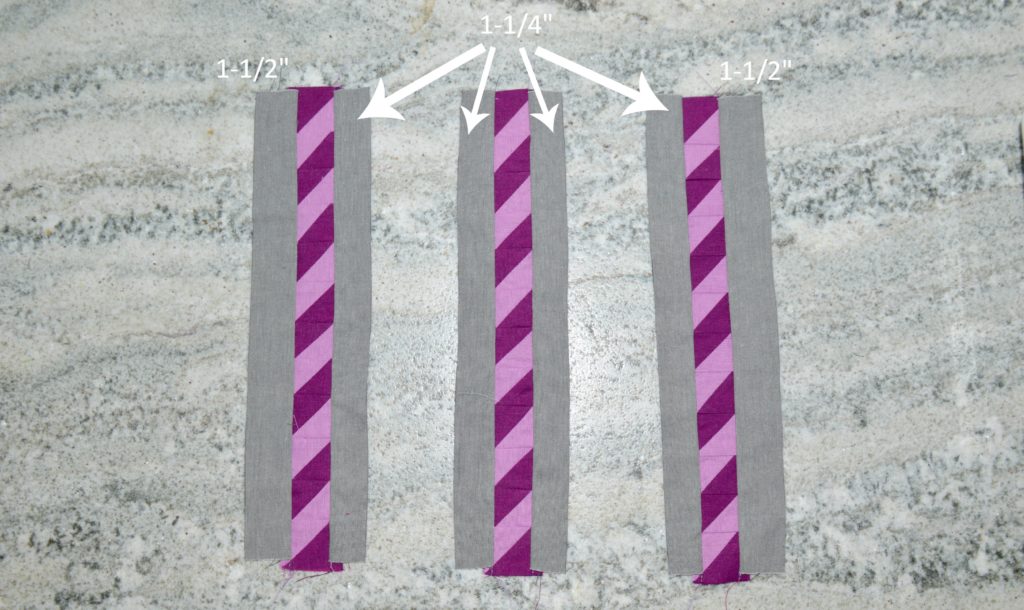
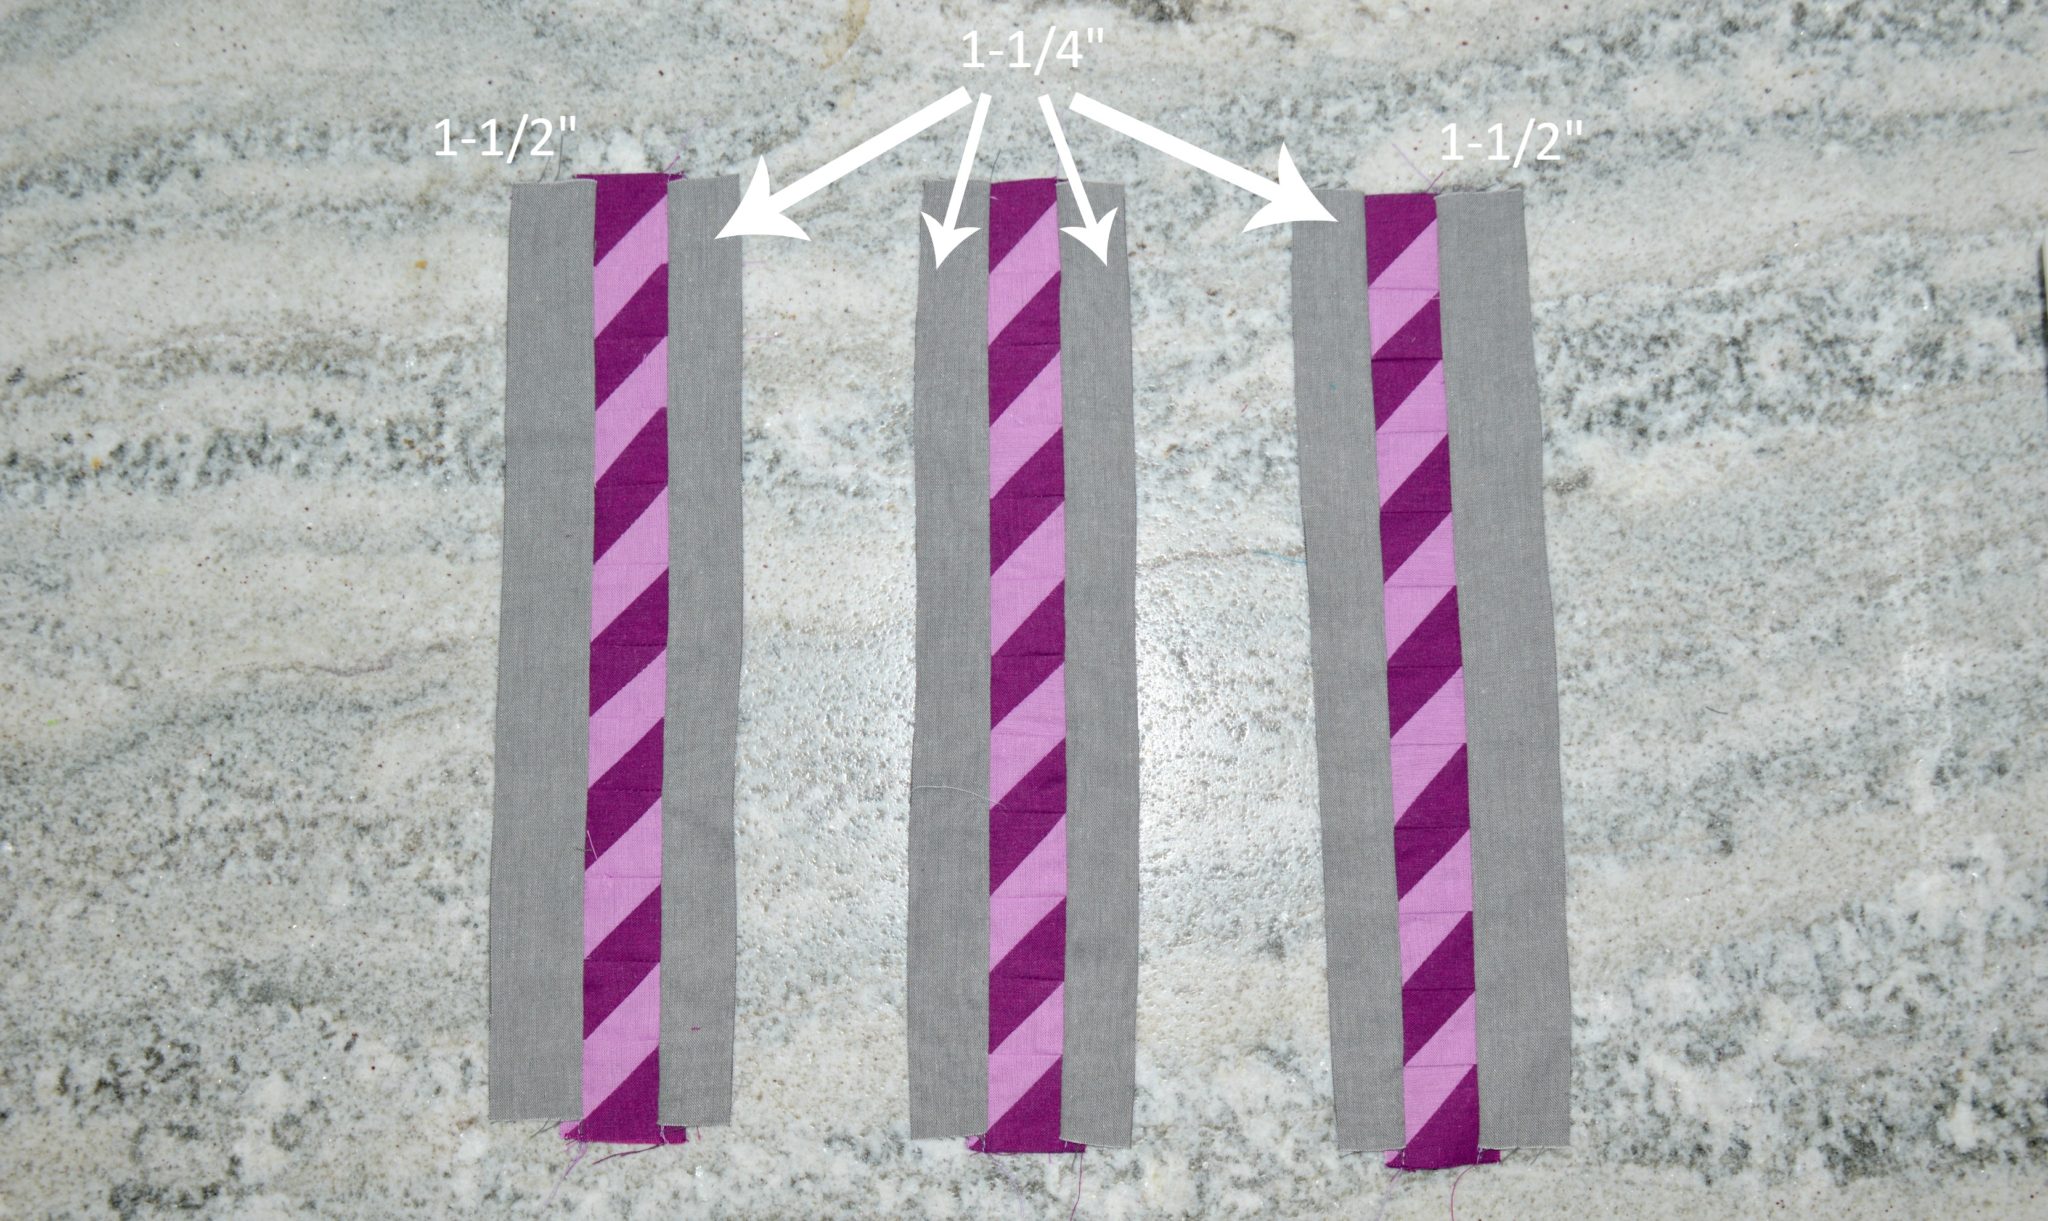
- 4 strips measuring 1-1/4″ x 12-1/2″
- 2 strips measuring 1-1/2″ x 12-1/2″
SEWING IT TOGETHER
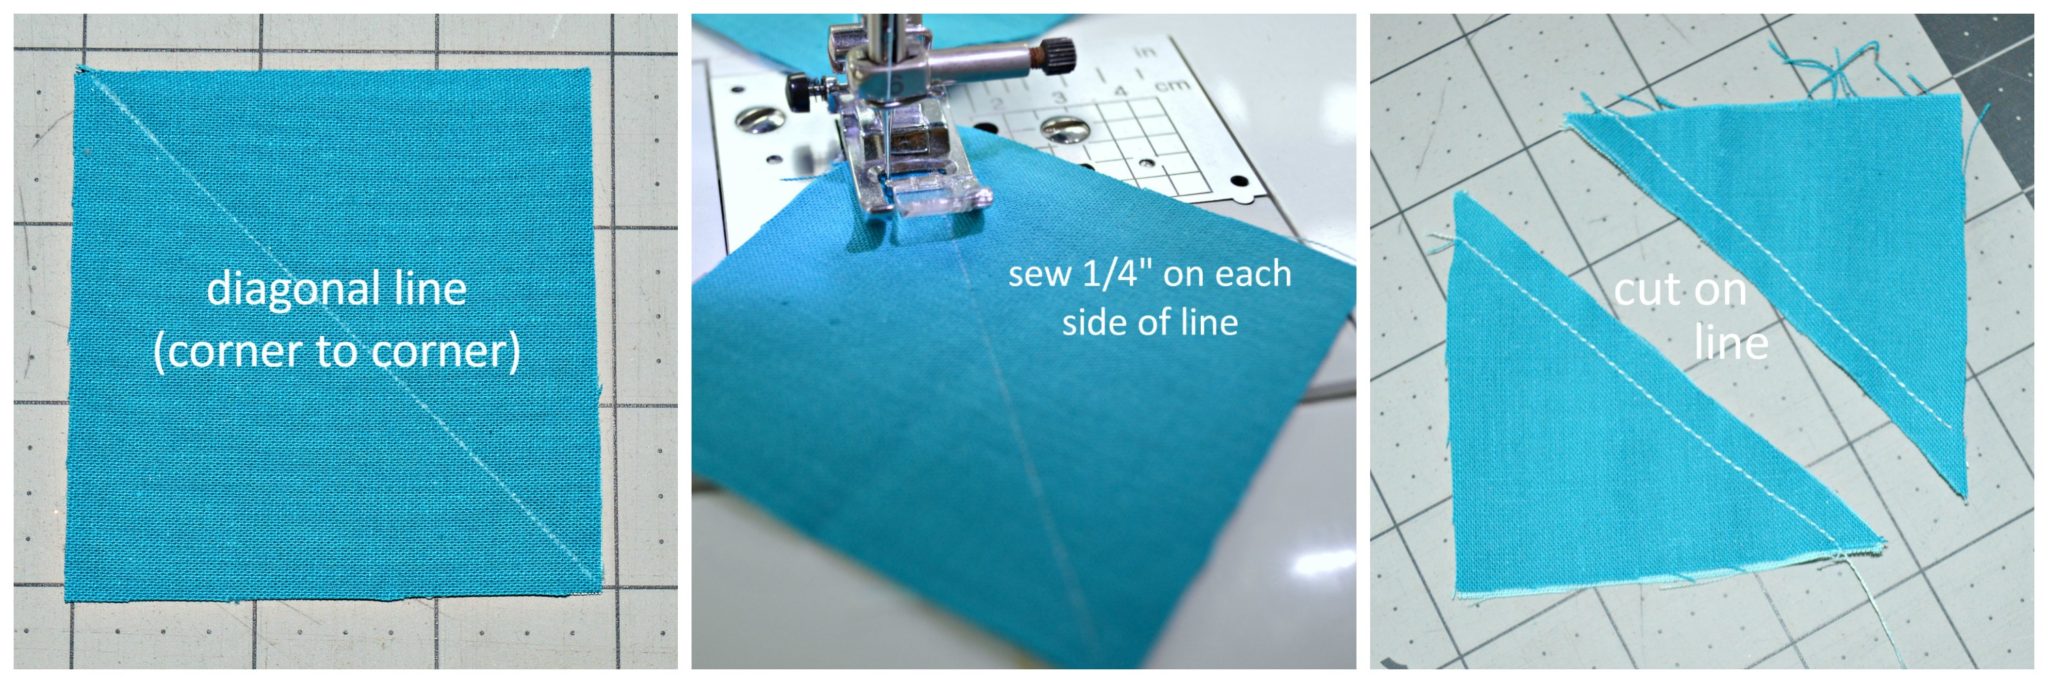
- Place a light blue and medium blue square so right sides are together. Draw a line from one corner diagonally to the other (I absolutely love using this chalk roller). Sew 1/4″ from the line on either side, and cut along the drawn line. Press open. Trim to size (2″x2″) if needed. Repeat for all blue pieces; you should end up with 12 blue HSTs.

- Repeat the process for the rose pieces. Place a light rose and medium rose square so right sides are together. Draw a line from one corner diagonally to the other. Sew 1/4″ from the line on either side, and cut along the drawn line. Press open. Trim to size (1″x1″) if needed. Repeat for all rose pieces; you should end up with 36 rose HSTs.
- Arrange the blue HST pieces so the colors alternate, forming a rope pattern. Fold the pieces on top of each other, right sides together, and sew. Continue down the rope until you have two full rope lengths made, comprised of six blue HSTs in each length, measuring 12-1/2″.
- Repeat the process for the rose HST pieces. Arrange the rose pieces so the colors alternate, forming a rope pattern. Fold the pieces on top of each other, right sides together, and sew. Continue down the rope until you have three full rope lengths made, comprised of twelve rose HSTs in each length, measuring 12-1/2″.
- Sew the gray strips to the pink ropes as shown in the image below. The 1-1/2″ strips will be on the outside, and the 1-1/4″ strips on the inside. (Tip: Do you remember when I mentioned the importance of *really* ensuring your foot’s 1/4″ marker really *is* at exactly at 1/4″? Look closely at the picture below, and you can see that each of the pink ropes ended up just a tad longer than the gray strips, which are exactly at 12-1/2″ due to the extra, though minimal, lengths that each HST ended up with due to the foot discrepancy. I ended up ripping the seams and resewing a few to decrease the discrepancy.)
- Sew the blue ropes to the gray strips.
- Press and enjoy your new Harbor Ropes block!

Here are some of the other beautiful blocks appearing today in the hop!
Host: Cheryl @Meadow Mist Designs
Miranda @I Have Purple Hair
Jennifer @The Inquiring Quilter
Sarah @123 Quilt
Leanne @Devoted Quilter
Jen @Patterns By Jen
Jennifer @RV Quilting
Amanda @Quiltologie
Sharon @Yellow Cat Quilt Designs
Jen @A Dream and A Stitch
Jen @Faith and Fabric
Carole @Carole Lyles Shaw
Stephanie @Quilt’n Party
Susan @Sevenoaks Street Quilts
Katrin @Now What Puppilalla
Amista @Hilltop Custom Designs
Nicole @Handwrought Quilts
Marla @Penny Lane Quilts
Silvia @A Stranger View
Sarah @Smiles Too Loudly
Carrie @the zen quilter
Mary @Quilting is in My Blood
Velda @GRANNYcanQUILT
Your Harbour Ropes are super, love the way you did the strips, angled the fabrics, and used the grey perfectly.
Aww, thank you Jean! That means a lot! <3
Thanks for sharing the idea behind your block!
Thanks, Anne! I love hearing about where others’ inspiration comes from, so thought I’d share mine, too.
Such a smart block. Well done
Thank you, Velda! I’had a few challenges, but happy with it overall.
Awesome block!
Thank you, Sharon!
I love your block and definitely plan to use your pattern in the near future. Many thanks!
Thanks, Jennifer! That means so much!
Very different-love the color placements-thank you
Thank you, Susan! It was fun to piece.
I like the motion that your bock creates with the stripes, Jen. Thank you so much for joining the hop!
Thanks, Yvonne – overall, I’m happy with the rope effect!
Lovely block, it reminds of the stripy rock I used to get at the seaside as a child.
Smiles
Kate
Kate, thank you! So many beautiful sights at the shore.
So pretty! I have been amazed at how unique and different each persons block has been. You did a great job on this!
Thanks, Amista – and yes, I can’t believe how different each block has turned out!!
This is such a fun block, I love the stripes!
Thanks, Cheryl – the alternating sizes of stripes were enjoyable to make!
This is such a unique block. Nice job on your tutorial!
Thanks, Stephanie – I’m glad you enjoyed the tutorial!
I loved reading about the inspiration for your block! The block is fabulous and I can picture it in a full quilt! Great job!
Thanks, Sarah! I’m excited to try this out in Christmas colors…it’ll be great for Candy Canes!
Pretty block – much different from many of the other approaches I’ve seen. I like it a lot – nice job!
Thanks, Ann – I really wanted to get away from a radiating center block, and am happy with this result!
I love the stripes on the diagonal, Jen! Great block 🙂
Leanne, thank you! I love the diagonal stripes, too 🙂
Now this is a fun block with lots of great movement. Looking at it puts me in a good mood.
Aww, you’re so sweet! Thank you!
Your block is very interesting. I love the barber-pole stripes-very different.
Yes, they do look like barber-pole stripes! I hadn’t thought of that before.
I love how the colors played out in your quilt.
Thanks, Mary – it was fun to play the darker and lighter colors against each other.
I like the vertical columns that form the ropes. I’m impressed with your tiny HSTs!
Thanks, Marla! They’re tiny indeed!
I love everything about this block and the inspiration behind it! Beautiful work, Jen!
Aww, Amanda, thank you!!
This a really different and effective block. I didn’t notice a difference using this fabric because I paper pieced but thanks for all your tips.
Abigail, yes, there were definitely some great things I learned in making this block – perhaps the machine change was the best. It’s amazing what such a small difference made!
Ahhh yes! I remember seeing this one on Instagram – love the inspiration for the block!
Thanks, Shannon! Inspiration is so easy to find at the sea.
Love the rope look of this design – so clever!
Thanks, Sue – really wanted something different!
Loved hearing about the inspiration behind this block. It makes the block so personal and charming!
Thanks, Jennifer – it’s pretty special to me!
Your block is beautiful! Thank you for sharing your inspiration story.
Thank you, Jennifer – it was a great block to make.
The block has a lot movement! Nice.
Dena, thank you! It’s amazing how fabric placements actually create movement.
I think it turned out very well! I liked the extra tips you gave in the beginning . Thanks for the pattern.