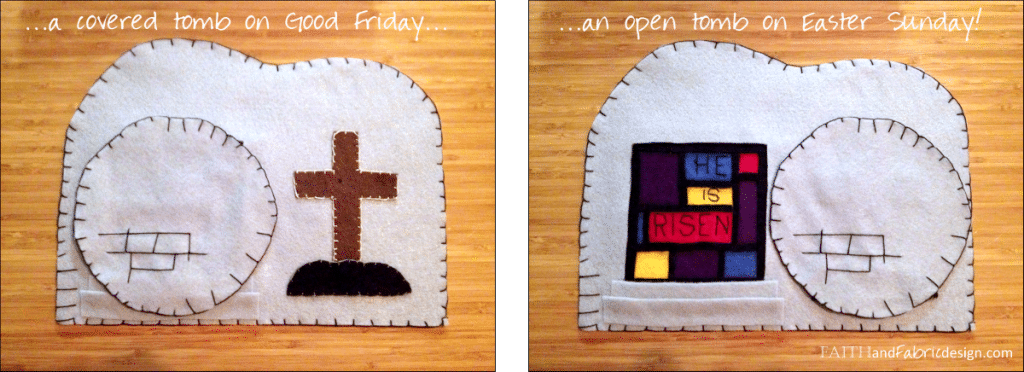
Easter week – or Triduum – is always so busy for everyone. These next few projects we’ll be doing together are to help prepare for that amazing week both mentally (as we study the readings on why we do these projects) and physically (as we make some great crafts that can be brought out to celebrate during Triduum and on Easter Sunday).
This week, we are making the tomb that Jesus was laid to rest in after dying on the cross. Today’s project can be as easy or as intricate as you want to make it. This project is also a great teaching activity as you can read both Luke 24 and John 20-21, which speak in detail about the events surrounding the disciples arriving at the empty tomb and Jesus’s resurrection.
On Good Friday, place the tomb somewhere visible in your home. Cover up the entrance to the tomb, representing Jesus being laid to rest. On Easter Sunday, move the boulder to cover the cross and let the beautiful stained glass show, reading “He is Risen” to all! The best part of felt is it sticks to itself, so you can just press the boulder down wherever you want it and it will stay. Pretty cool!
WHAT YOU NEED
- five pieces of felt: brown, black, and three gray
- felt scraps in any color (hint: use the pieces left from making your Jesse Tree)
- scissors
- fabric glue
- OPTIONAL: fabric marker / sharpie
- OPTIONAL: embroidery floss in gray, tan, and black + needle
HOW TO MAKE
3. Take the piece of felt you just cut the square & cave top from, and place it over the third buy klonopin online piece of felt. Trace the inside of the tomb box onto the lower piece of felt.
4. Set the tomb/cave piece of felt aside…you’ll come back to it. Using that third piece of felt – and the box you drew on it as a guide – use your felt scrap pieces and create a “stained glass”. Be creative! There’s no right or wrong way to do this.
OPTIONAL: I wanted to stitch some wording on mine (as opposed to just writing with a marker), so I flipped three pieces of the felt over and wrote “He is Risen” on them backwards, then used this as a guide.
5. Once you’re happy with your placement of the stained glass, you’re ready to add the “lead” to your stained glass window. First, glue down the colored felt pieces. Then, using the black felt, cut four thicker strips and glue them along the edges. They should overlap quite a bit over the edges…that’s ok as it will get covered up. Cut thin pieces of black felt to use on the inside, making each color of felt it’s own window pane.
7. Next, glue the tomb/cave piece of felt down over top of the stained glass you just created. Trim off the top of the cave so the lower piece of felt has the same curve as the upper piece.
8. Using the brown and black felt, create a cross and a small mound for it to sit on. Glue down opposite the stained glass/tomb entrance. I also added two steps leading up into the tomb to give it a more realistic feel. See the final project photo at the beginning of this post.
OPTIONAL – BUT FUN! I wanted to embellish the tomb/cave/cross a bit, so I added a basic blanket stitch to most everything. ! I also back-stitched a few “rocks” into the boulder itself. This is completely up to you whether you want to do this – it’s definitely the time consuming part and isn’t really appropriate for younger kids…though the stitch itself is super easy. You could always just embellish with a fabric marker or some glitter puffy paint.
Thanks for joining me for this project – I had lots of fun making it, and had been wanting to do a felt project for a while now. Let me know how it goes for you!

Hi Jen, I love this idea! I'm going to try and replicate it using construction paper for my students. God bless!
Noreen, be sure to let me know how it turns out! It's actually pretty easy to do, and I'd love to see the result with paper. BTW – I spent some time on your blog yesterday, looking through all your ideas. They are wonderful!
Good morning Jen! I did use your idea with cardstock yesterday and it turned out great! I posted about it today and linked it back to you. It doesn't show up as clearly on my photos but I did use a grey colored pencil on my tomb. If I had had the felt materials, I would have tried it but I didn't. And since I'm a volunteer RE teacher, I need to use what I can from home first 🙂 Event he parents exclaimed happily how they liked the craft at pick up. So, your idea was a hit! God bless!
I just ran across this idea — LOVE it! I will be using it with my kids and RE classes–thank you for sharing!
Cheryl
http://www.diary-of-a-sower.blogspot.com
Cheryl, it's an honor to have you stop by! Love your site.
what a cool project! I love this, and plan on making one for the kids before holy week!
Nancy, I'd love to hear how it goes! Please send a pic and I'll post it to the site. Thank!