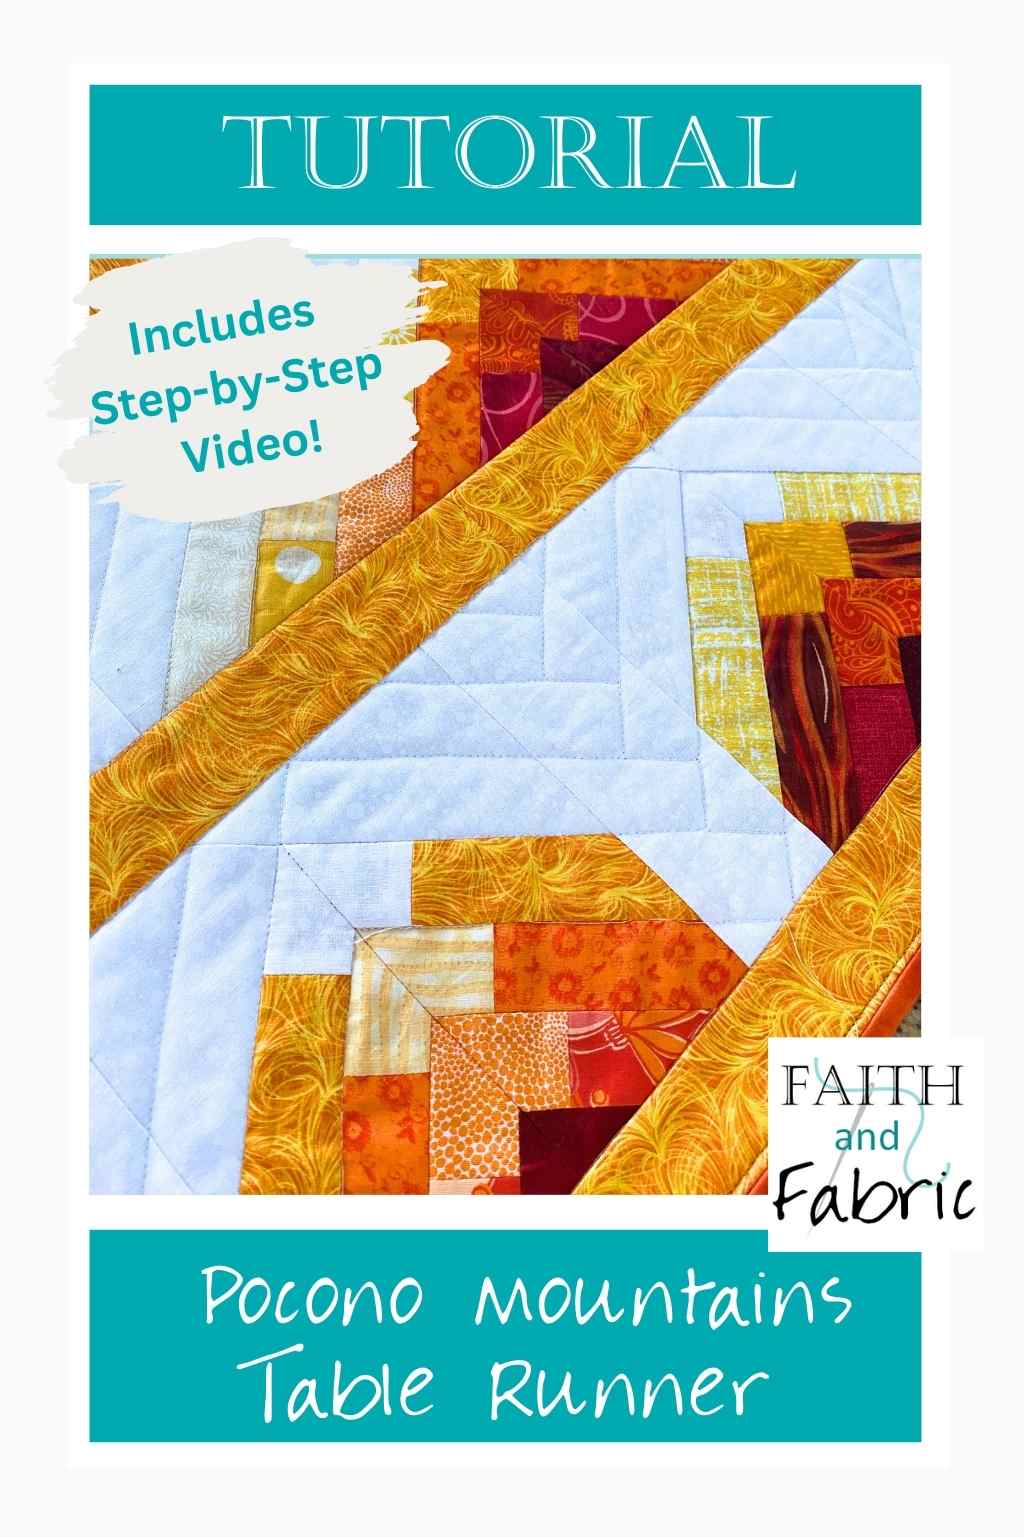
Welcome to Week 12 of the Around the Block US Tour at Faith and Fabric, where we will be making a Pennsylvania-themed Pocono quilt block! If you’re new here, welcome! Faith and Fabric is a Christian quilt company specializing in Christian quilt patterns, fabrics, and sewing classes. If you’ve been here before, I warmly welcome you back.
Onto the block. I grew up on the east coast of the United States in central New Jersey, a wonderfully green state where everyone, it seemed, had large back yards and the most amazing back yard gardens. It’s no wonder the state motto is “The Garden State”! Almost all our family lived in northeast Pennsylvania, and we drove multiple times each year to visit them, always through the breathtaking Pocono mountains.
I have so many memories of watching the seasons change on these gorgeous hillsides – in the spring at Easter, they were full of the brightest hues of new green and growth. During the winter, the sheer rocks shined bright black against the layer of ice that covered them as the mountains sat in a hushed layer of snow. The fall, though…the fall was my favorite. The vibrant, crisp reds, oranges, and yellows of all the trees captivated my visual senses as we made the two hour journey over the river and through the woods to grandmother’s house! The mountains are so beautiful, they’ve even been voted the fourth best destination for fall foliage in the USA. This amazing image, from Mountaintop Lodge in the heart of the Poconos, brings back so many memories of those drives.
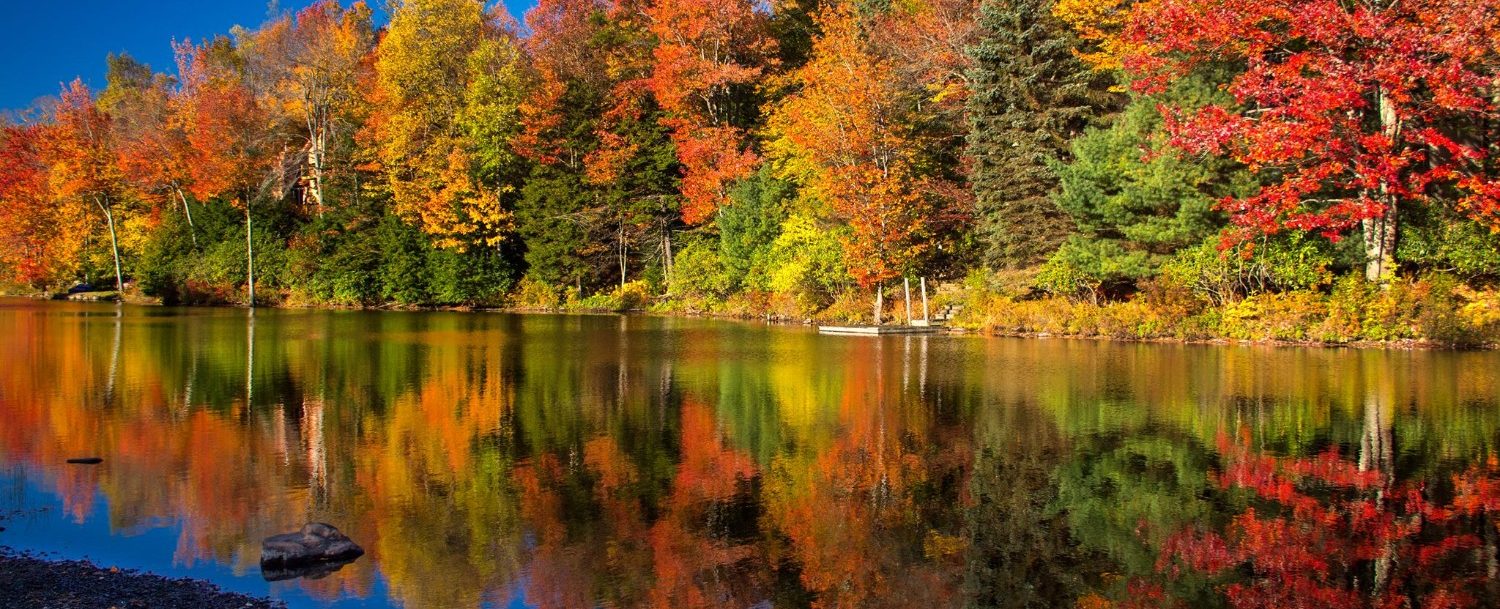
It’s these warm memories that inspired my quilt block. I wanted to capture the height of the rolling hills, as one mountain seems to meld into the second. I wanted to capture the warmth of the leaves, from the deep red leaves closest to the road to the lighter yellows higher up on the mountain. I wanted to capture the white mountaintops, with hints of snow…and then realized I had to scale it back to fit into a finished 6″x6″ block. So, the snow had to go…but I was able to bring it back in this full video tutorial showing you how to not only sew the blocks but turn them into a beautiful fall table runner!
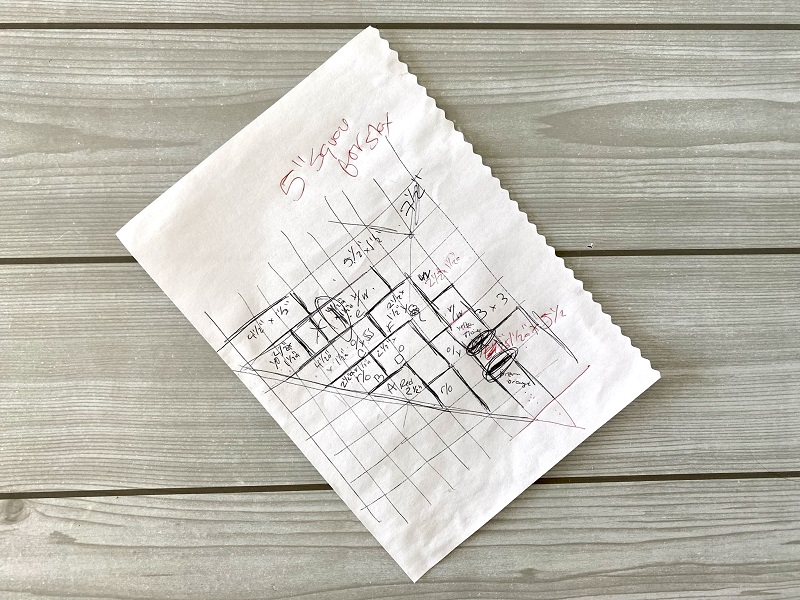
I thought it would be fun to share a bit of the design journey with you in making this block before we get into the block itself. Below is my *very* unscientific design…I can assure you, my 8th grade math instructor would not be impressed. I wanted to set the block on the diagonal to take advantage of the natural movement that a diagonal quilt block provides; trying to make all these as half square triangles at such a small size would be a bit too much of an undertaking, and would leave too much fabric on the backside when it came time to quilt.
My first try turned out great – but, way too wide. I admit, I got carried as I continued to build mountains behind mountains! I love this version so much, though. It measures 6″ tall finished, but (obviously) about three times that wide. So, time to make a few adjustments.
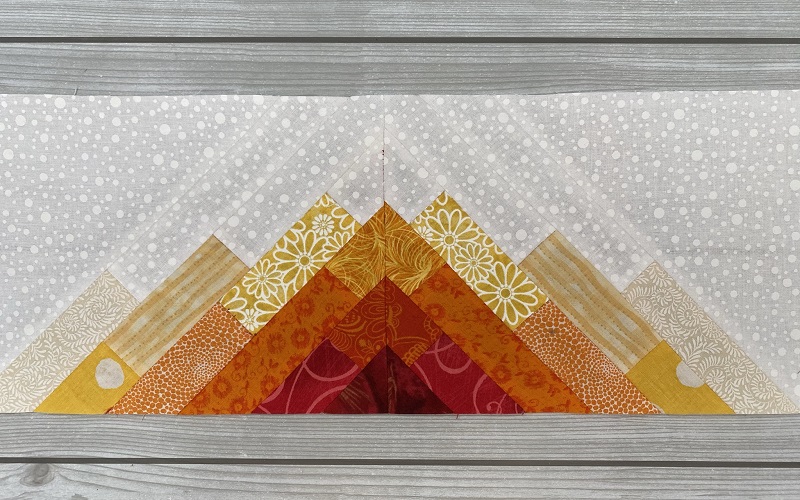
I went back to my diagonal sketch, and made the changes you see in red. That resulted in these two lovely blocks, which we’ll be making today:
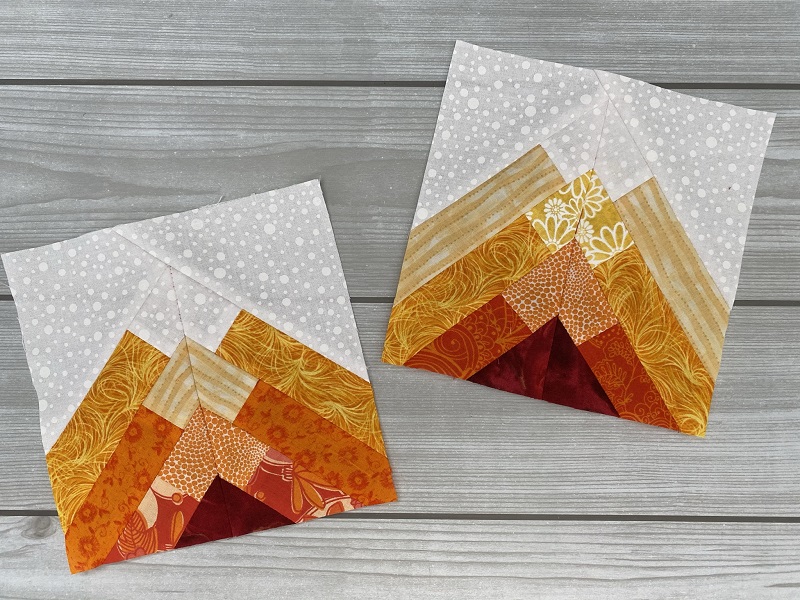
WHAT YOU NEED:
- sewing machine
- iron
- fabric sheers
- fabric pins
- chalk and graphite fabric pencil (I swear by this one!)
- fabric starch
- fabric scraps in (A) red, (B) red orange, (C) orange, (D) light orange, (E) orange yellow, (F) light yellow, and (G) white
HOW TO MAKE: (assumes all fabrics have been pressed and starched)
…one quick note. Sew with scant seams, and if you’re worried about ending up short on fabric, make your rectangles an extra inch longer. You’ll end up with more scrap/trimmings, but it may make the final product a bit easier for you to trim.
- Cut a 2.5″x2.5″ square from your (A) red fabric. Cut in half on the diagonal and set aside.
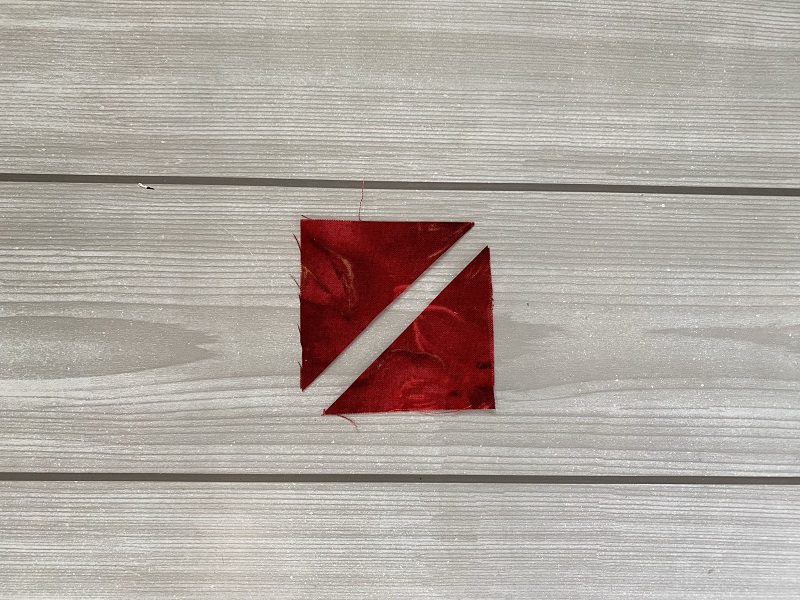
- Cut two 2.5″x1.5″ rectangles from your (B) red orange fabric and two 2.5″x1.5″ rectangles from your (D) light orange fabric. Place one set of (B) and (D) right sides together, and sew down the 1.5″ side. Press open. Repeat for the second set. Cut a 45* angle from the top of fabric (D) from one the right on the first set, and repeat on the second set cutting from the left.
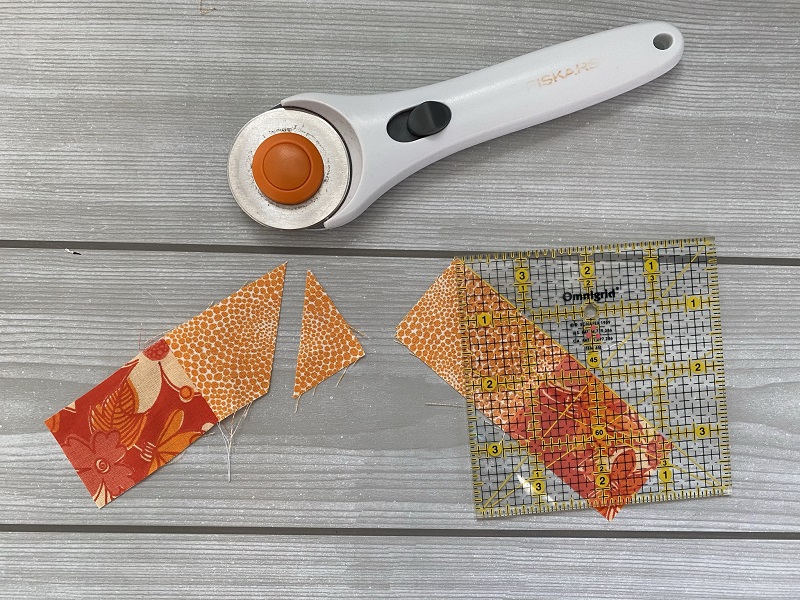
- Line up the long edge of your (A) red triangle with the long end of your (B/D) fabric, and sew. Press seams open and set aside. Repeat for the second set.
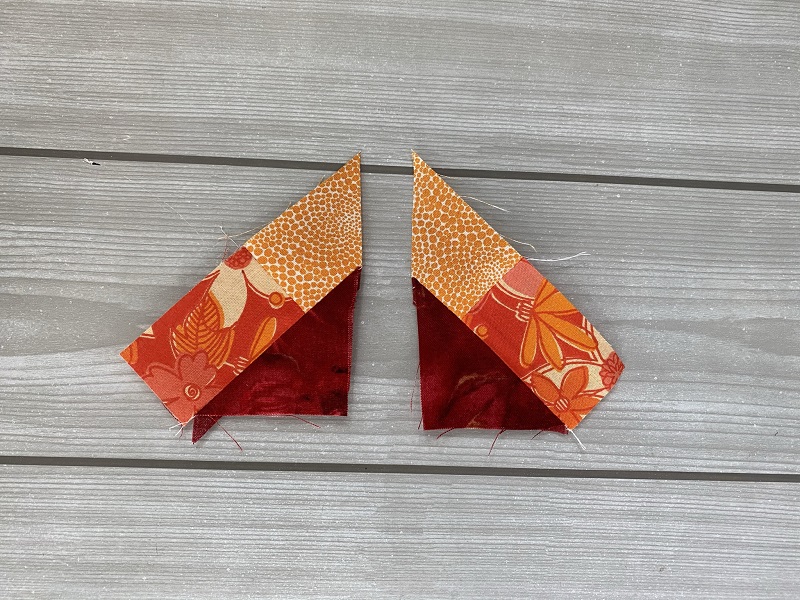
- Cut two 4.5″x1.5″ rectangles from your (C) orange fabric and two 2.5″x1.5″ rectangles from your (F) light yellow fabric. Place one set of (C) and (F) right sides together, and sew down the 1.5″ side. Press open. Repeat for the second set. Cut a 45* angle from the top of fabric (F) from one the right on the first set, and repeat on the second set cutting from the left.
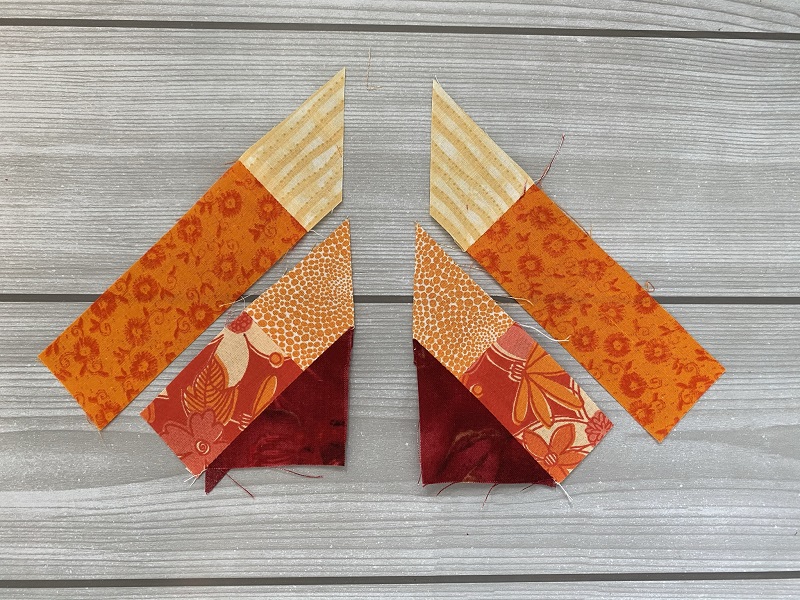
- Line up the long edge of your (C/F) newly created strip with the long end of your (B/D) fabric, and sew. Press seams open and set aside. Repeat for the second set.
- Cut two 5.5″x1.5″ rectangles from your (E) orange yellow fabric and two 2.5″x1.5″ rectangles from your (G) white fabric. Place one set of (E) and (G) right sides together, and sew down the 1.5″ side. Press open. Repeat for the second set. Cut a 45* angle from the top of fabric (G) from one the right on the first set, and repeat on the second set cutting from the left.
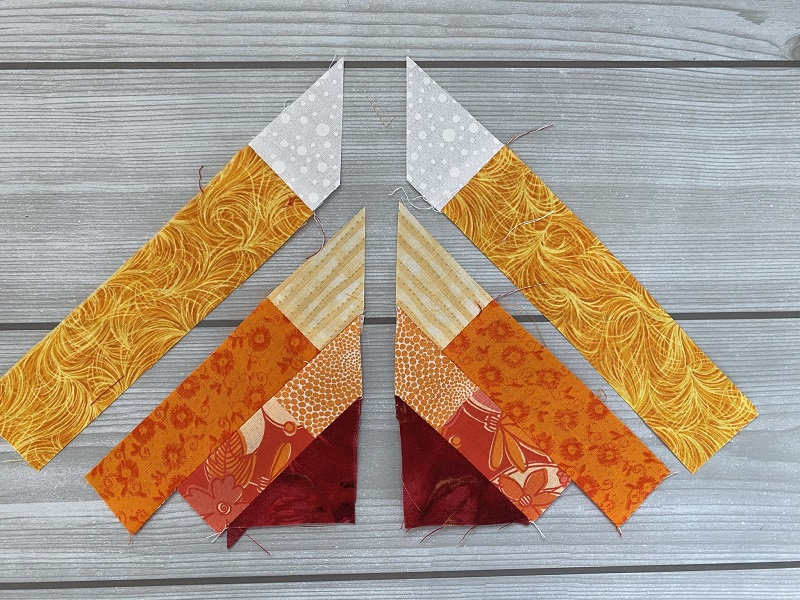
- Line up the long edge of your (E/G) newly created strip with the long end of your (C/F) fabric, and sew. Press seams open and set aside. Repeat for the second set.
- Place the two halves together, right sides together, and sew to form the main mountain. Use pins to make sure your seams/colors line up. Sew down the center and press seams open.
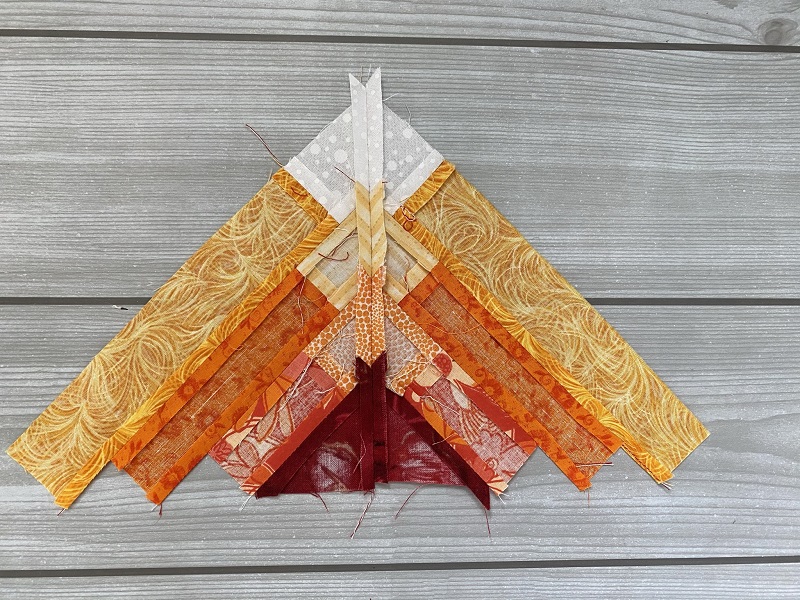
- Cut a 6″ square from your (G) white fabric, then cut the white square in half along the diagonal. Line the first white half triangle on your (E/G) strip, right sides together. Let it overlap about an inch and a half to two inches. Sew and press open.
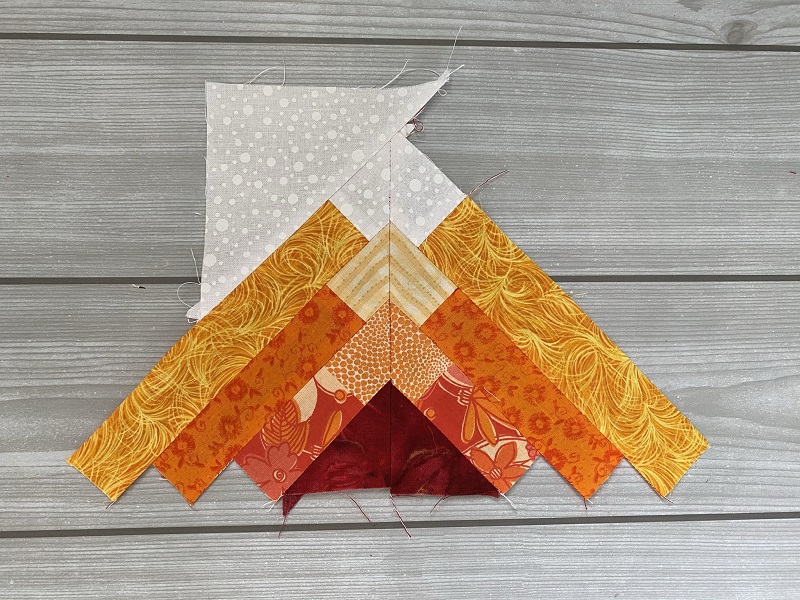
- Trim the tail from the mountain as shown in the photo.
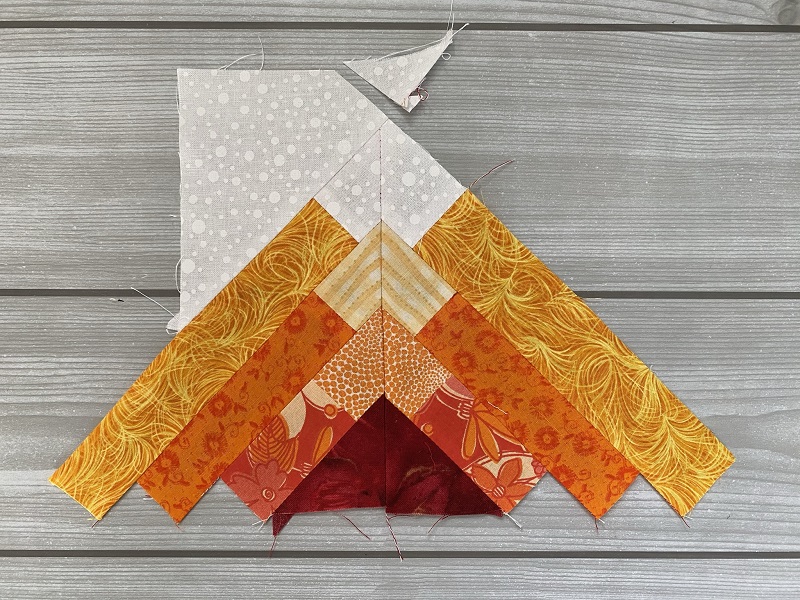
- Attach the second white triangle, again lining it up at the top, right sides together, and sew. Press open.
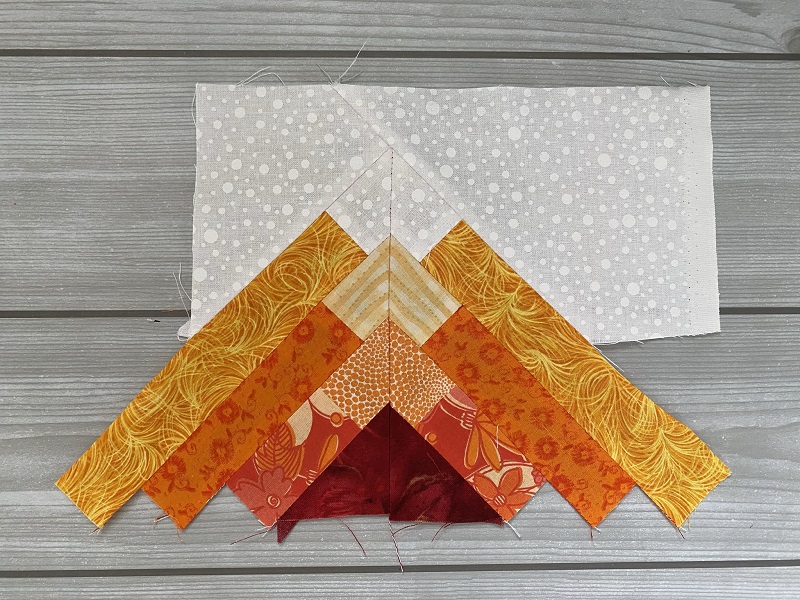
- Using your ruler, trim the sides to 6.5″ x 6.5″. (if you have a 6.5″ ruler, line up the center ruler line (3.25″) along the center of the mountain line).
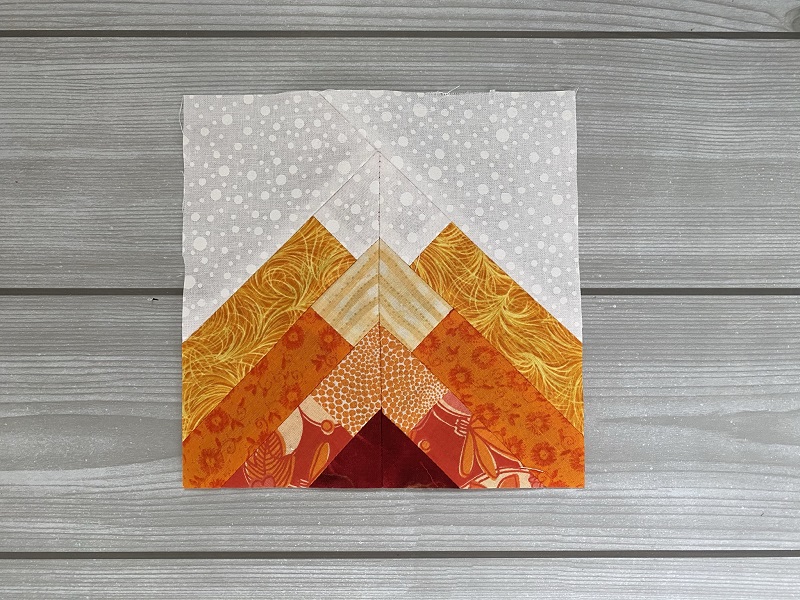
- Enjoy your Fall in the Poconos block! I hope you enjoyed exploring the beautiful mountains with me. I invite you to stick around a bit, and continue exploring all that Faith and Fabric has to offer.
The snow is still there, and as those colours fade upwards, beautiful. Off to sort out some batiks for your lovely block.
Jean, thank you! I love hearing that the snow is still there…and yes, the fading is exactly what I was hoping for with this block. Thanks!
That photo is fantastic! Such beautiful fall leaves. Love your block!
Thank you, Jennifer – wish I could take credit for that photo, but it really does look like that every year. Breathtaking!
this is wonderful. what a great way to bring the fall colors into the house. i am a bit confused on one part though. on the part where the first 5 inch block is put on, how do I know how far up to put it. It looks like it is above the peak. Thank you
Hi Lori,
Sure, see if this helps. If you look at the photo, right after the one where you trim the 45-degree angle, you’ll then fold over and have two 1/4″ tails that overlap when you place the right sides together. Sew, and trim the tails.
Thank you !
Denise, you’re very welcome! Thanks for joining the journey.
So beautiful – I might just make 4 blocks in the seasonal colors you mentioned! I love your hills. I am from Iowa – A hill there is very similar to a lump of potatoes in PA. Flatlanders.
Thanks for the pattern and all the great ideas.
Aww, Joan, thank you so much! I love how this can be a seasonal block even outside the fall – you can use it in the spring, summer, fall, etc. based on the colors you use.
Looks like you got your snowcap after all! Thank you for sharing how you came to this design and the pattern.
Hi Patti – I’m so glad you like this tutorial for the block. It really was such a beautiful memory to drive through the Poconos!
The block is beautiful and being as I live on the west coast, this will be the closest I get to seeing it.
I printed off the tutorial but have not been able to find the link to download it to my PC. I would appreciate any advice.
Thanks and have a great day.
Marge – St. of WA
Marge, same! I’m in San Diego, so we don’t have much fall here, either, now that we’ve relocated. Also, you’re not missing the link – in this case, this is a free tutorial on how to make the block. There is no separate pattern to download.
Hi Marge – just a quick note that I added a way for you to now download the pattern. See above – and happy sewing!
~ Jen
As a “newcomer” to PA , (I’ve only lived here 43 years) I don’t think you left out anything about PA! I’ve been traveling around the state for the past year (before Covid hit) and have seen most of the state. I originally came from NY state, in the Finger Lakes region, and moved here after marrying my hubby before we got out of the Army. (Yes, we were both “soldiers.”) Thanks for the gorgeous block!!
Vivian, I’m so glad you like the block! How beautiful the weather must have been in NY, too…the east coast has the most lovely seasons.
WHAT A BEAUTIFUL BLOCK !!! Oh how I wish for a mountain view from flat Southern Delaware. Found your post from a link with Debbie Wendt, who once came to my guild (Ocean Waves Quilt Guild, Lewes DE) to speak and teach. I love that folks are still sketching on paper to create patterns.
Aww, thank you, Mary! Yes, this block came from a *very* messy sketch on paper. In the end, it worked out perfectly!
Dumb question. but how do you download this pattern?
Hi Carol – not a dumb question at all. This block is a tutorial, so no pattern needed to download – everything you need is shown here.
Hi Carol! Just a note that you can now download the pattern…I made a .pdf that you can download and print or save. Enjoy! Link is above.
Thanks for a lovely block, and good memories from times camping in the Poconos with my husband.
Susan, I’m so glad! The Poconos were simply gorgeous.
I miss the colors of fall! Your photo is a great reminder of just how beautiful fall is!
Iwaswondering , is there a way to download your pattern and instructions?
Yes, I miss them, too! The beach is gorgeous, but I miss the seasonal changes. As for downloading…I don’t have a download, no. Just this tutorial.
I forgot to mention, I also grew up in New Jersey, I was born in Morristown and grew up I. The Montville area.
Yeah for New Jersey!!
This block brings back many good memories. My in-laws had a sm. house between Jack Frost + Big Boulder ski sites. But the drive up from Del. in Fall was always a delight to the eyes. Thanks for the blocks.
Robin, I’m so glad! Jack Frost…my last name is Frost, and we used to have a cat named Jack 🙂
Thank you for the beautiful block. I love the fall also.
Joy
Thanks, Joy – the fall is my favorite season, too.
Is it possible to get the pattern for the Penn block? I don’t know how to pin for later.
Hi Jo – there’s nothing to download…just a tutorial 🙂
Hi Jo! Just a note that you can now download a copy of the pattern. See above – enjoy!
Blessings today! I’m new here from Quiltfabrication. I love these blocks, the first wide one you designed, snd the two smaller. You could create a whole mountain range with both. Most all the leaves are off the trees here in Idaho, but fortunately now snow on the ground yet. After 40 years in Alaska, I’m happy to not have the extreme freezing temps or early snows, tho the northern lights are a blessing to see all winter.
Blessings today! I’m new here from Quiltfabrication. I love these blocks, the first wide one you designed, snd the two smaller. You could create a whole mountain range with both. Most all the leaves are off the trees here in Idaho, but fortunately now snow on the ground yet. After 40 years in Alaska, I’m happy to not have the extreme freezing temps or early snows, tho the northern lights are a blessing to see all winter.
Minnie, I’m so glad you liked this block! It was truly a joy to create…and yes, an entire mountain range would be so so cute!
And I forgot to mention (please excuse the autocorrect errors above!), I grew up in VT. As kids we called the fall foliage, Chex Cereal, remember the sugary colored ones! We used to pick th3 maple and oak leaves and iron them between wax paper, for cards, name place cards for Thanksgiving. Blessed be!
Aah! Chex Cereal! I love that!
I reread through this again. I’m sure I must have commented when your block was first introduced. I’m originally from Wilmington, Delaware. Over the years as a child my dad would pack all 4 kids in the car (and our mom) and we visited a different relative or friend when the leaves were at their peak. I loved seeing the trees. Of course we had our own trees, but the ones in the Pocono’s came first and there were so many! It was fun visiting relatives around Hazelton (Dad’s birthplace and where he grew up and lived until 1950 when he married my mom or a couple years. Many things stopped or changed when our parents separated then divorced. I was in high school during this years so I kept busy. Later I met my husband and his parents had bought a small vacation home in a town between 2 ski resorts, Big Ben(?) and Jack Frost, if you remember them. Charlie and I made good use of that cabin, even took my youngest brother and a friend of his up the weekend there was a major snowstorm and the phone & power during the early hours of Sat.went out. We were all watching an old movie. Luckily he and his father had cut and had a good woodpile there except we had to cut it in half or quarter each log. This house was NOT well insulated. and we all lived in this tiny family room for 2 nights. We debated going home on Sunday even though it was all down hill it was a whiteout and they were encouraging people to stay home as the roads were still so dangerous. Once you got down a level or 2 we have to worry about Black Ice. Something nothern Delaware and outside Philly is known for! We got home the usual 2 hr drive took at least 4hr., probably more. Gas station, stores, etc were all closed. We have lots of memories of the Pocono area. I have a special road that is my favorite for viewing trees from the car. At that time Wilmington was great. I lived in the city. It was 2hr to the mountains and 2hr to the Shore either NJ, Del, or MD beaches. I know it’s all changed now Wemoved to Florida in 1980 even tho the beach was my favorite, after age 50 my life shifted and my No. 1 place now are the mountains. I miss being in the forest, the smell, all the things one can learn and the nature related crafts I learned in Girl Scouts (Brownie’s thru Seniors). Anyone is lucky who can have the best of both worlds like we did. We tried to share that with our sons. I’m glad we went out of our way to do things like camp in th Georgia Mtns and walk on the Appalacian Trail. BUT, I WILL NEVER FORGET OUR POCONO HOUSE, swimming in one lake and trying to sail in another in Summer with stars all over the sky. Thanks again for reminding me of such beautiful memories. *** Now I’ll have my own to remind me of those days, I may add a few more items to remind us of the good times we had. I will try to send you a pic. I may be in a year or so.
Robyn, I loved reading your story!! YES – I totally remember the Black Ice, and completely agree with you on how amazing the smells and colors of the mountains were (and are). Thank you for sharing your lovely memories!
Thank you for this block it is a pattern i have been looking for. Can’t wait to make it. (Too many projects in the way, hahaha). And, I love your name for your site.
Dotty.
Dottie, thank you for your kind words! Definitely check out the video, too, and you’ll be able to turn this into a full quilt table runner for autumn.